How To Post To Instagram From PC or Mac

Wondering how to post to Instagram from a PC or Mac computer? You’re in the right place…
To the dismay of people all over the world, Instagram does not allow us to upload photos or videos to our profiles from your desktop or laptop.
This is an intentional move from Instagram to encourage mobile use of the app and engagement with other users. However, for many photographers, influencers, and businesses whose content has been taken or filmed on a camera, the task of sending everything from desktop to phone to post manually can be very time-consuming!
Luckily, there are a few ways around this issue using third-party tools or clever desktop hacks. We’ve compiled lots of info from the web about how to post to Instagram from any computer, PC, or Mac, and put it into this handy guide!
How To Post On Instagram From Computer
There are 4 ways to use a laptop or desktop computer (PC or Mac) to post photos and videos on Instagram.
- Scheduling Tools
- Hopper HQ
- Changing Browser User-Agent
- Chrome
- Safari
- Third-Party Tools
- Bluestacks
- Deskgram
- Uplet (Mac only)
- Other
- Facebook Creator Studio
Post On Instagram From PC or Mac With Scheduling Tools
The easiest way to post to Instagram from PC or Mac is with a scheduling tool. This offers similar features to the instant services detailed below, but also allows you to bulk upload and schedule your photos and videos to post in the future. Scheduling Instagram content saves heaps of time, and allows teams and individuals to be extra organized when planning what to post and when!
⭐ Check out our How To Schedule Instagram Posts guide here ⭐
Hopper HQ
Using Hopper HQ, you can post photos and videos to Instagram from your desktop with ease and can choose between sending them instantly or scheduling for the future. Here’s how it works:
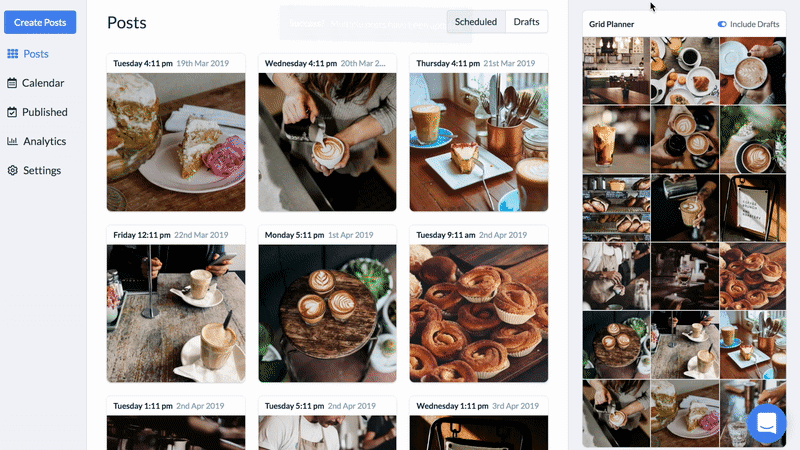
- When you make an account with Hopper HQ and log in to your dashboard, you are greeted with all of your current scheduled posts in the order they are going to publish. As well as this, with the Grid Planner you can see how all of your scheduled posts will look on your Instagram profile once they’ve been published, allowing you to easily plan a great feed aesthetic…
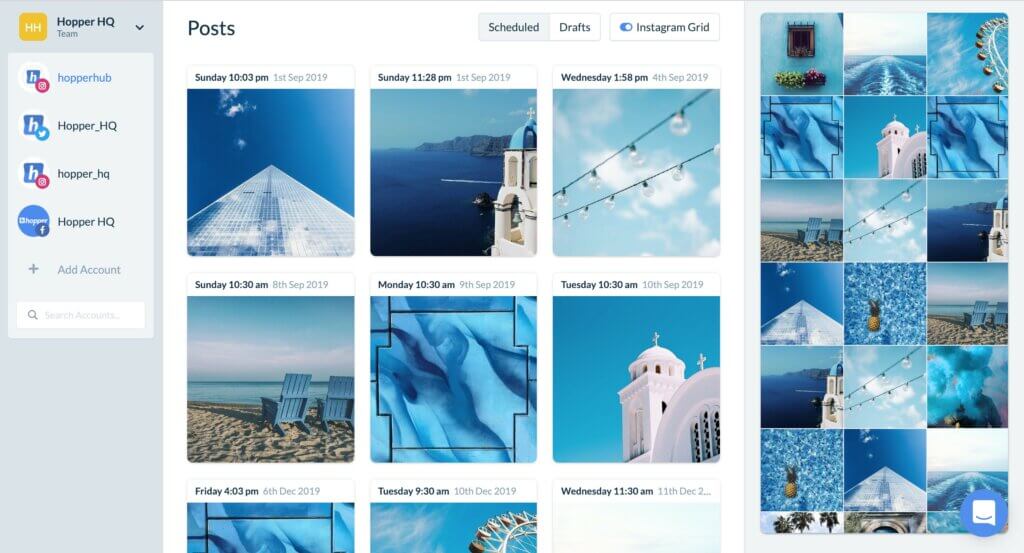
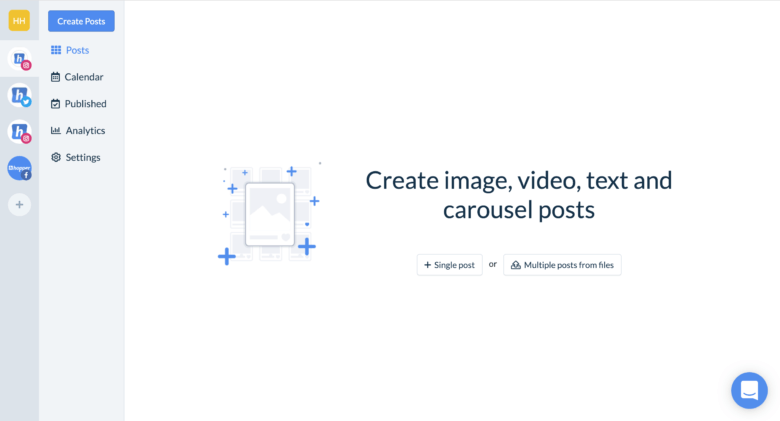
The Hopper HQ dashboard and grid planner allow you to plan and manage all your Instagram content in one place. - By clicking on ‘Create Posts’ in the top left corner, you are taken to a window where you are able to upload 50 photos or videos at once. To post to Instagram from PC or Mac with Hopper HQ, you’re able to upload files from your device, Dropbox, Google Drive, Google Photos, Box, URL or web search. This is very handy if you work collaboratively on cloud file sharing sites and want to post to Instagram from your desktop.
Bulk upload up to 50 photos and videos from multiple sources including Google Drive and Dropbox. - If your images are not the correct size for Instagram, you will see an alert and be taken to the photo editor. Here you can crop your photo with Hopper HQ’s easy pre-set dimensions for portrait and landscape photos, as well as apply any filters or edits.
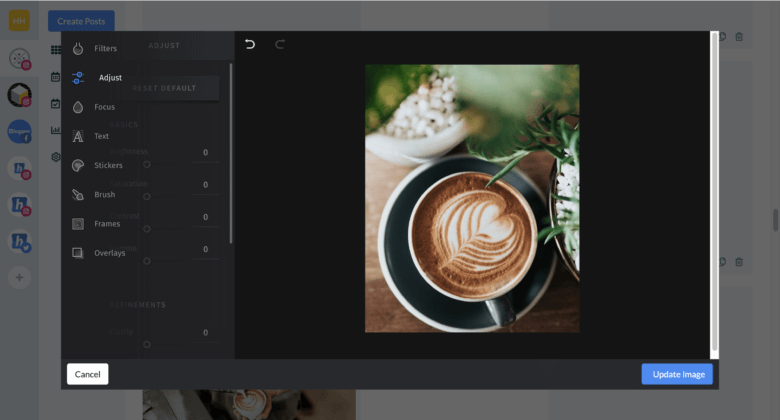
Edit your posts for Instagram with Hopper HQ image editor. - Once you’ve made any edits, you can write captions for all of your uploads (including emojis) as well as the first comments for your hashtags. You then have the choice to ‘Post Now’, schedule a time, or save as a draft (a handy feature if you’re working in a team). If you decide you want to post the same photo to another Instagram account, or even a Facebook or Twitter page, you can easily add accounts to the right-hand side of the post using the plus icon.
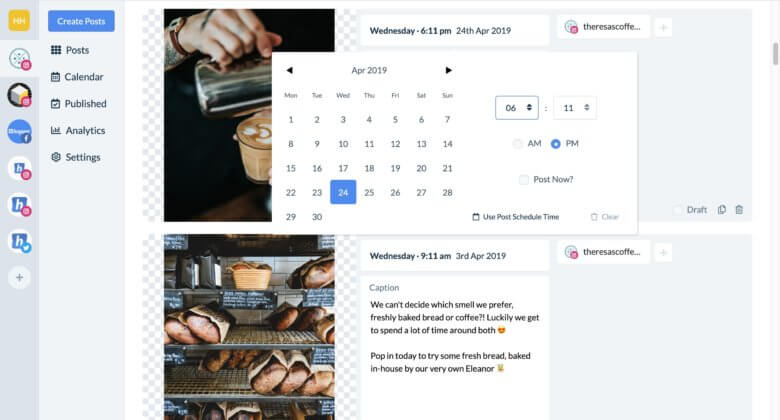
Schedule your Instagram posts with captions and first comments in advance on Hopper HQ. - Now your photos and videos will appear in the dashboard! Any changes can be easily made by dragging and dropping, and the Instagram Grid Planner shows you an accurate view of what your feed will look like on Instagram once all your scheduled posts have been published.
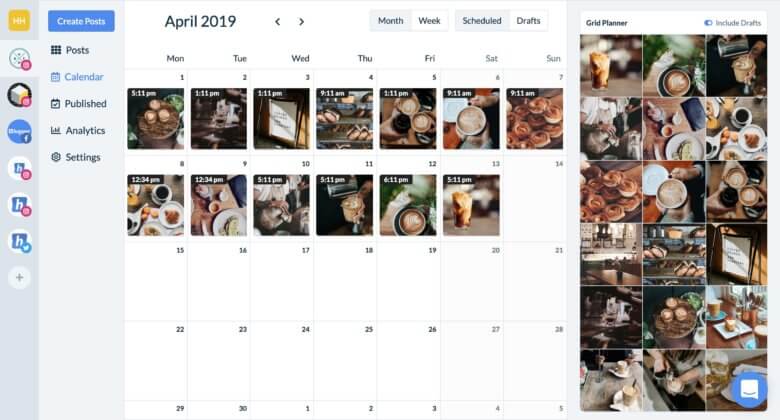
Hopper HQ also has a calendar view to easily keep track of your posting consistency, as well as user-friendly Analytics to monitor the success of your content and inform you of your audience demographics!
Plan your social media posts.
Visually plan your posts. Drag and drop everywhere.
Pricing:
Hopper HQ works on a subscription basis by the number of accounts, starting at:
- 1 Instagram + 1 Facebook account + 1 Twitter + 1 Linkedin for $19 monthly, or $16 monthly if paying annually
The more accounts you add, the cheaper the tool becomes.
Take a look at the pricing calculator to find out more!
Summary:
Hopper HQ does far more than post to your Instagram from a PC or Mac. It has been built to help people manage Instagram at scale, and is constantly adding more features to make the process even easier.
Plan & schedule social media ahead of time.
Video, gallery & image posts
Calendar, feed & grid preview
Instagram, Facebook & Twitter
START PLANNING YOUR POSTS NOW
Change Browser User Agent To Post On Instagram From A Desktop or Laptop
This may sound complicated, but is probably one of the simplest ways to post to Instagram from PC or Mac. It requires no third-party site or download and is completely free. However, the method is very basic and does not work with video files or gallery posts.
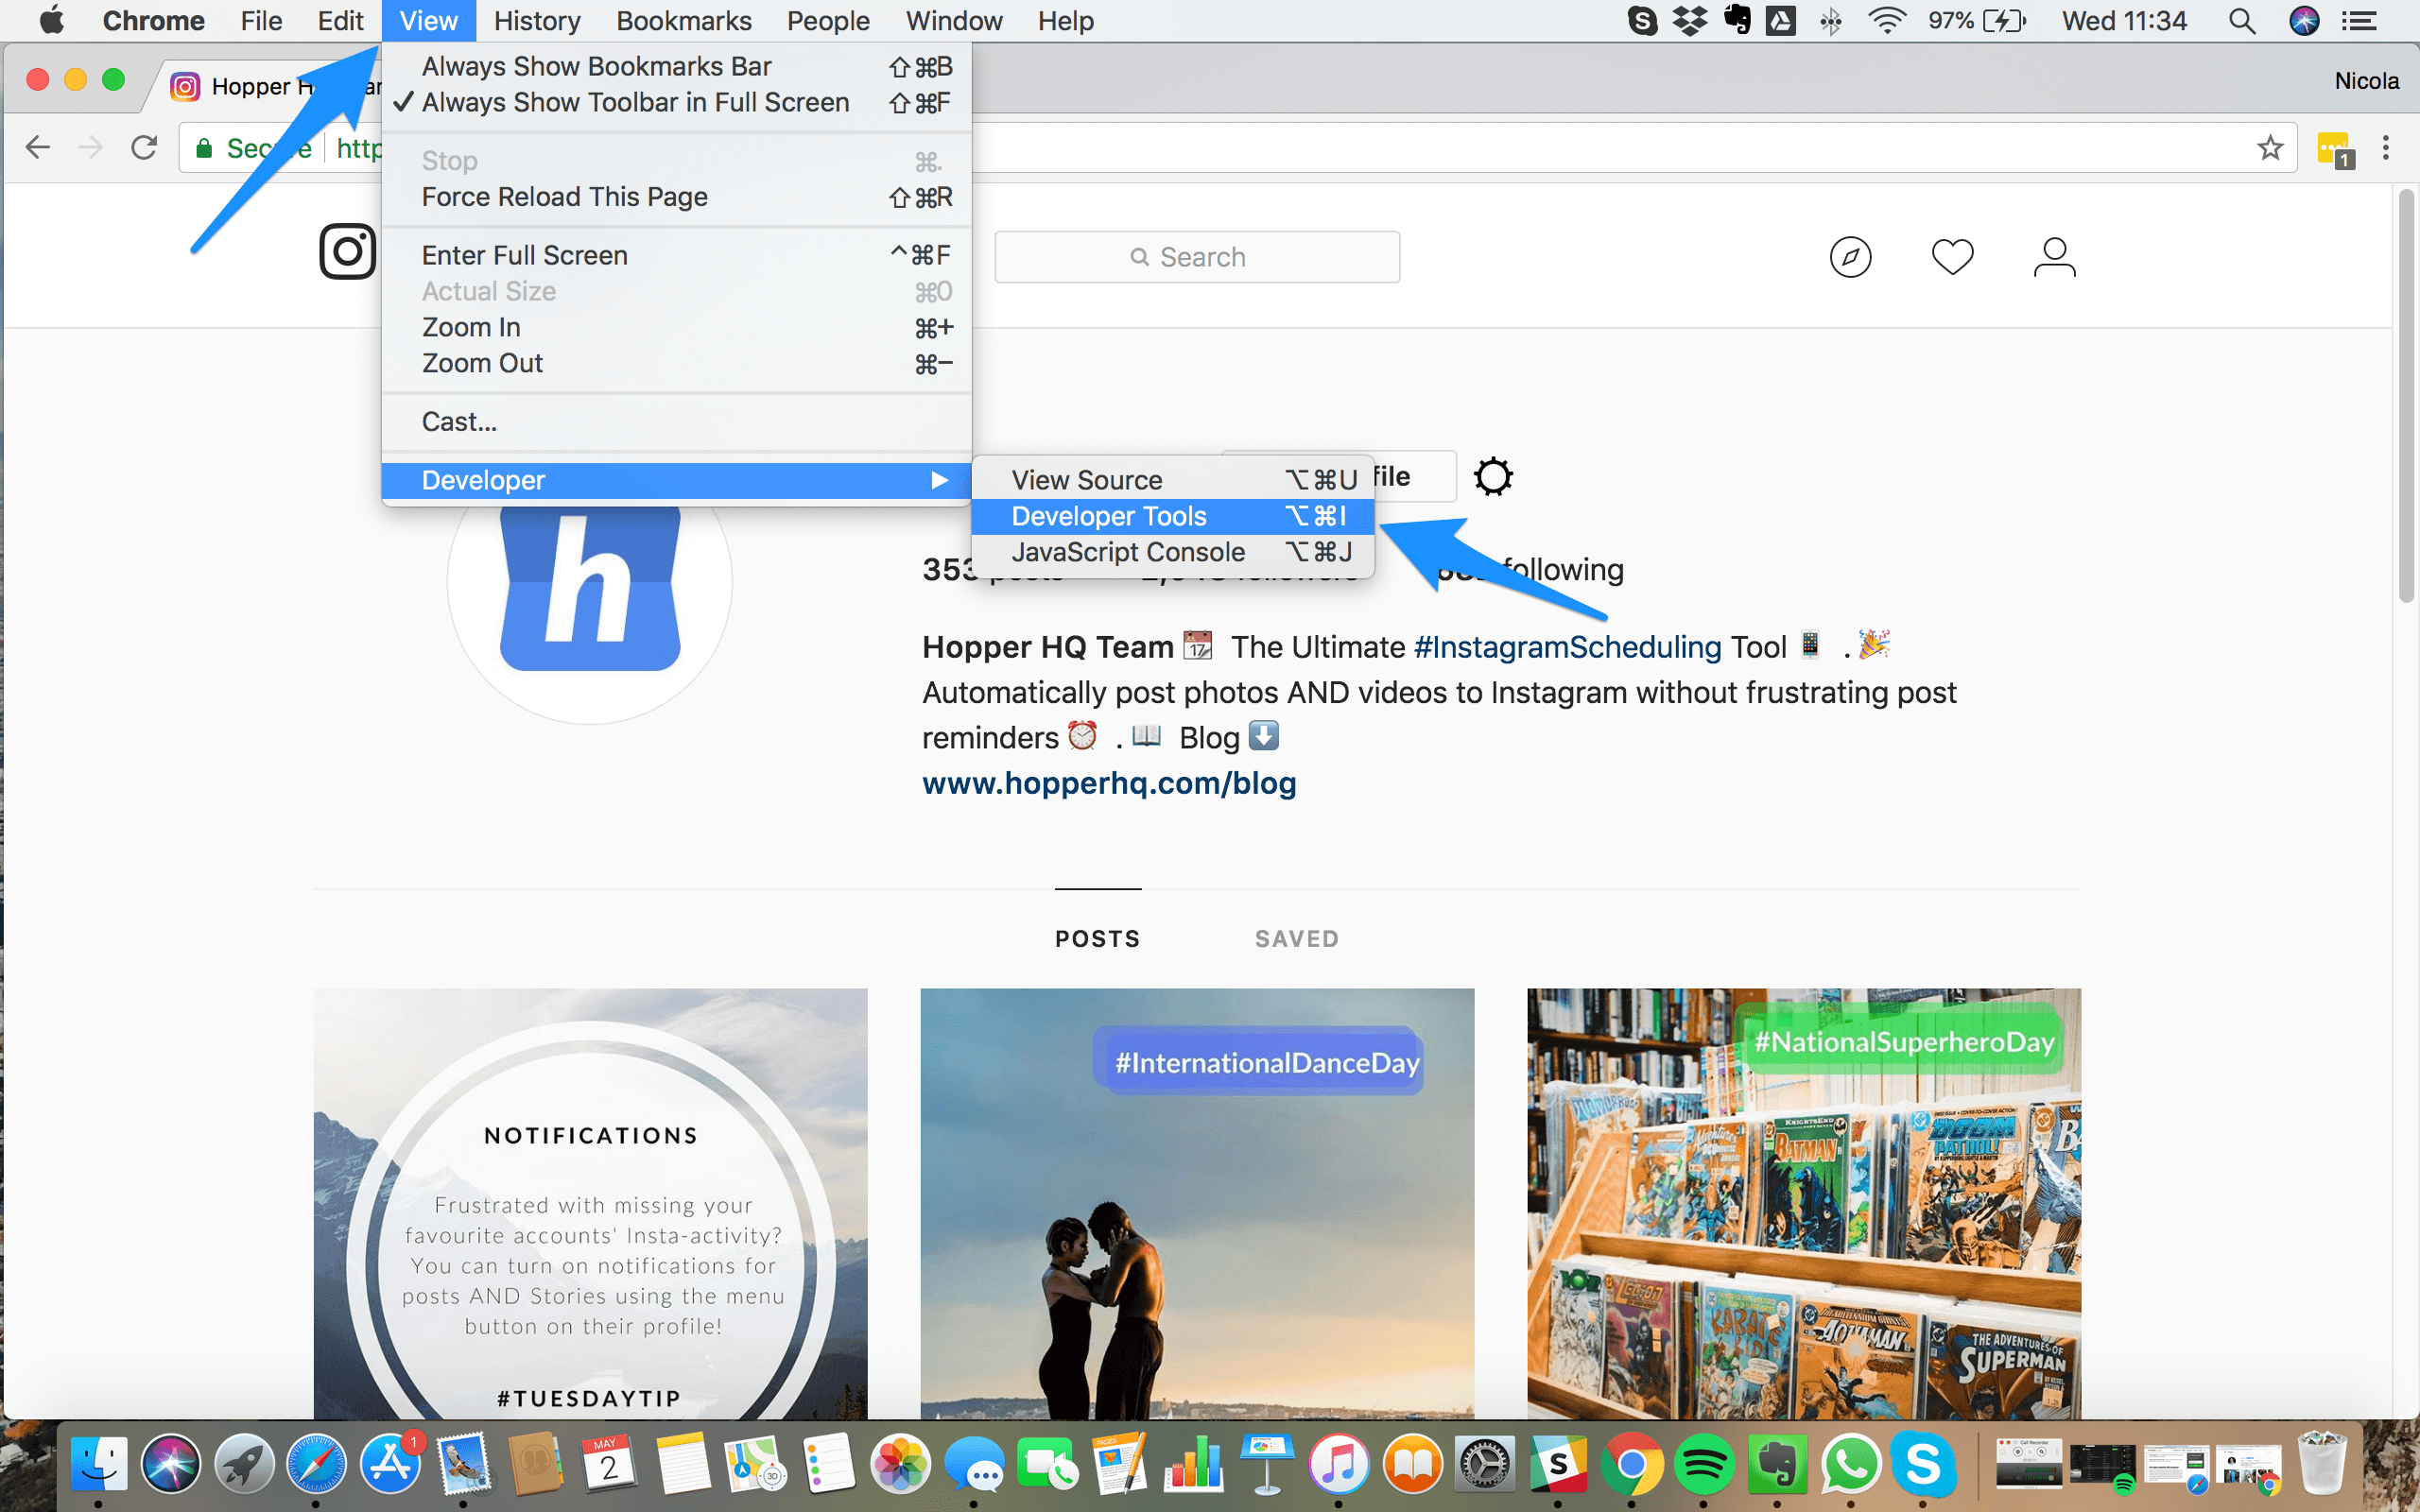
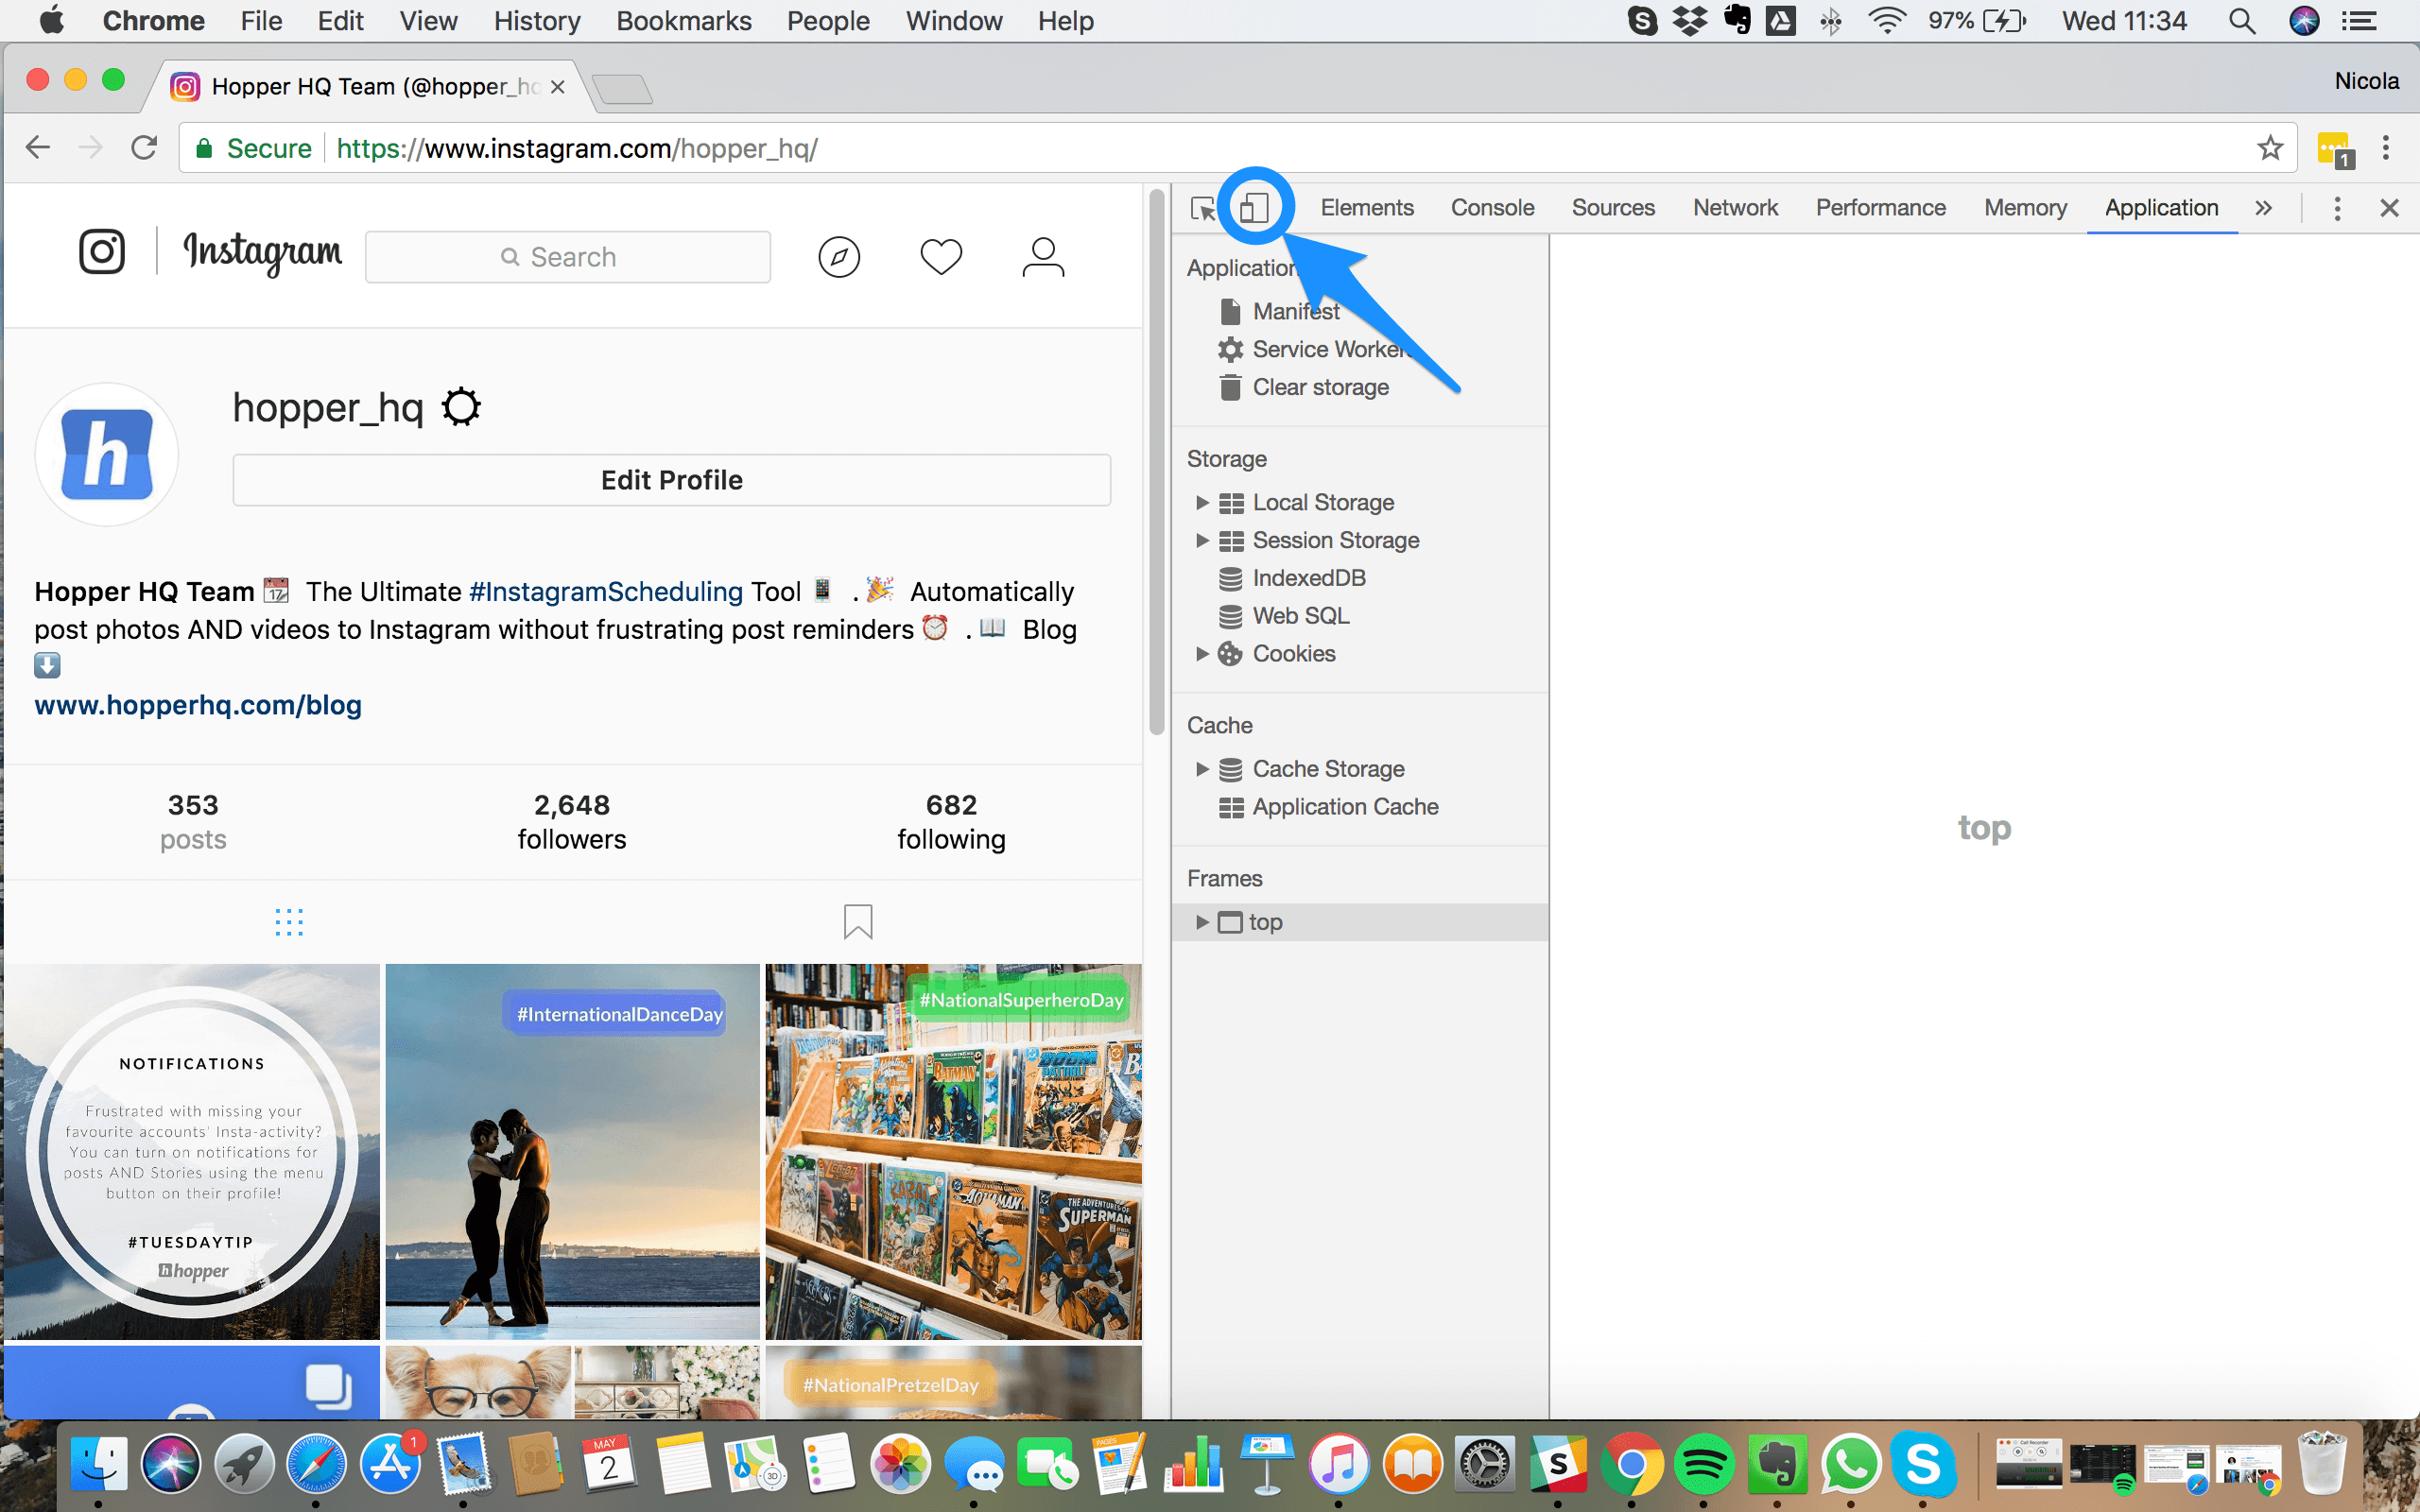
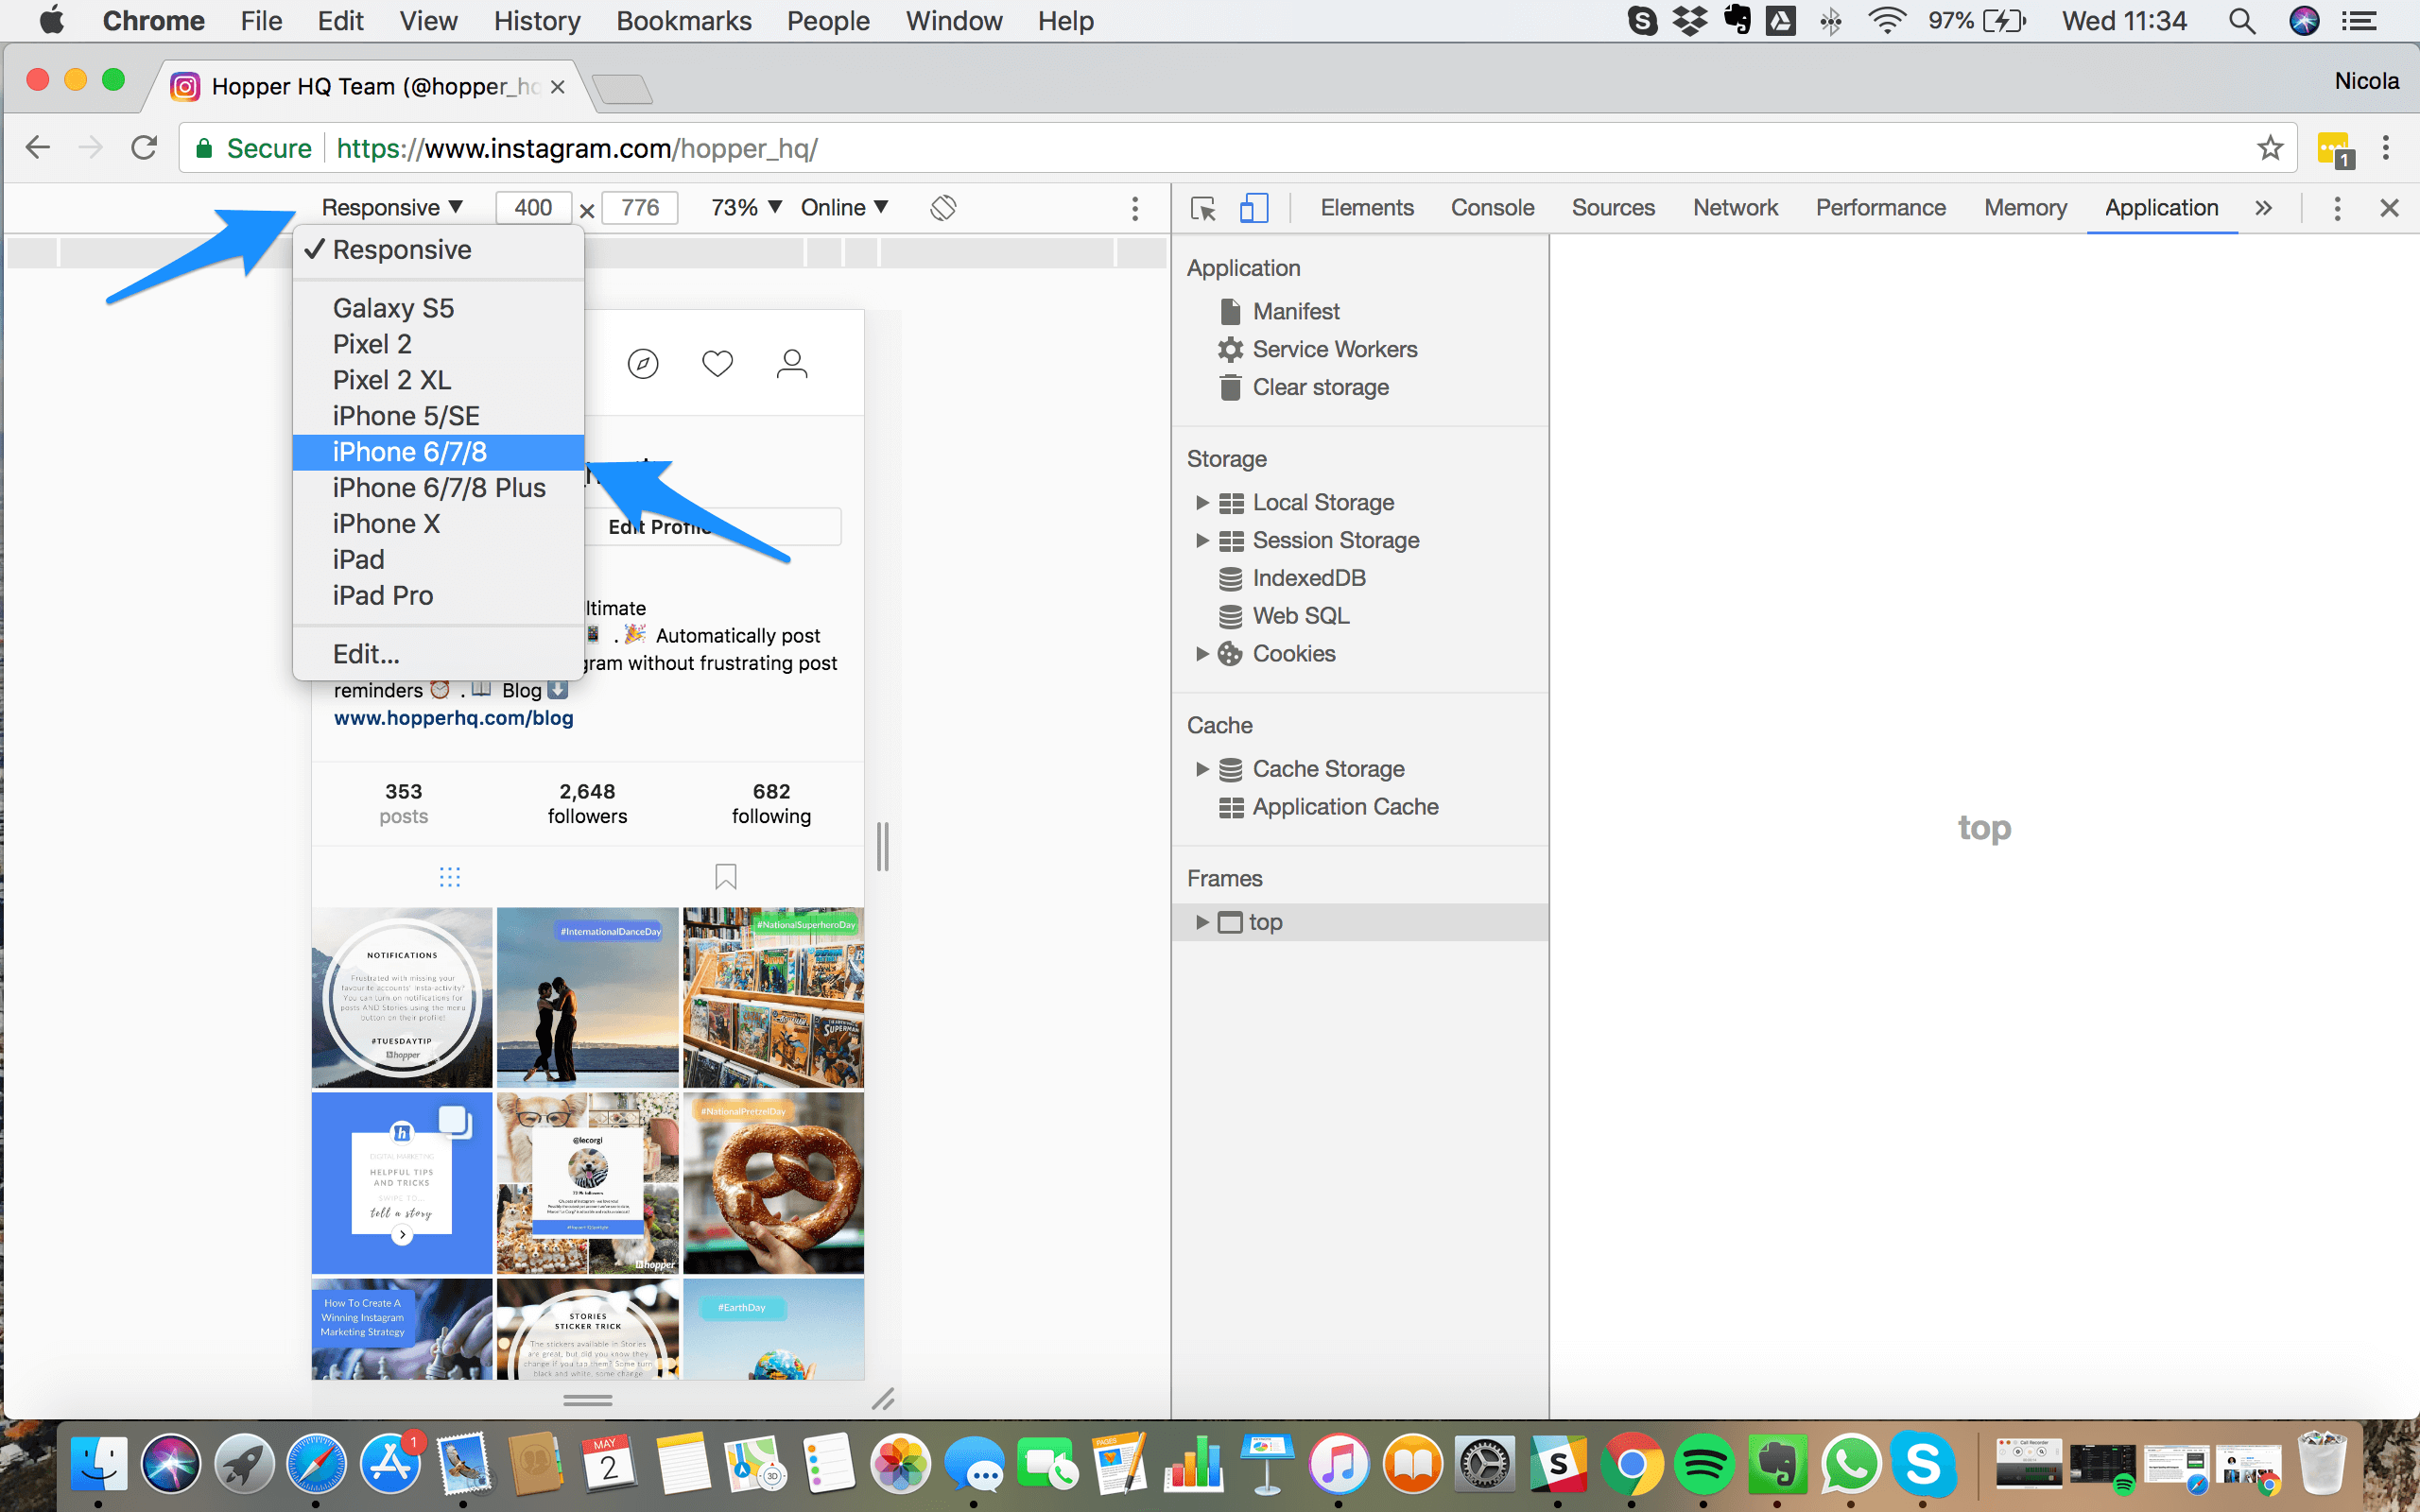
In his in-depth guide, David Coleman explains that ‘the user agent is a piece of code that the browser sends to the website to tell it information about the browser and operating system you’re using’. Essentially, on the desktop version of Instagram, you can tell your browser that you’re viewing the site on a mobile, and then the ‘upload’ button that is usually unavailable will appear when you refresh! Here’s how to do it:
(Disclaimer: I’m using Mac so the screenshots will vary for Windows users, but all the same options should be there!)
How To Post on Instagram From Mac
Chrome
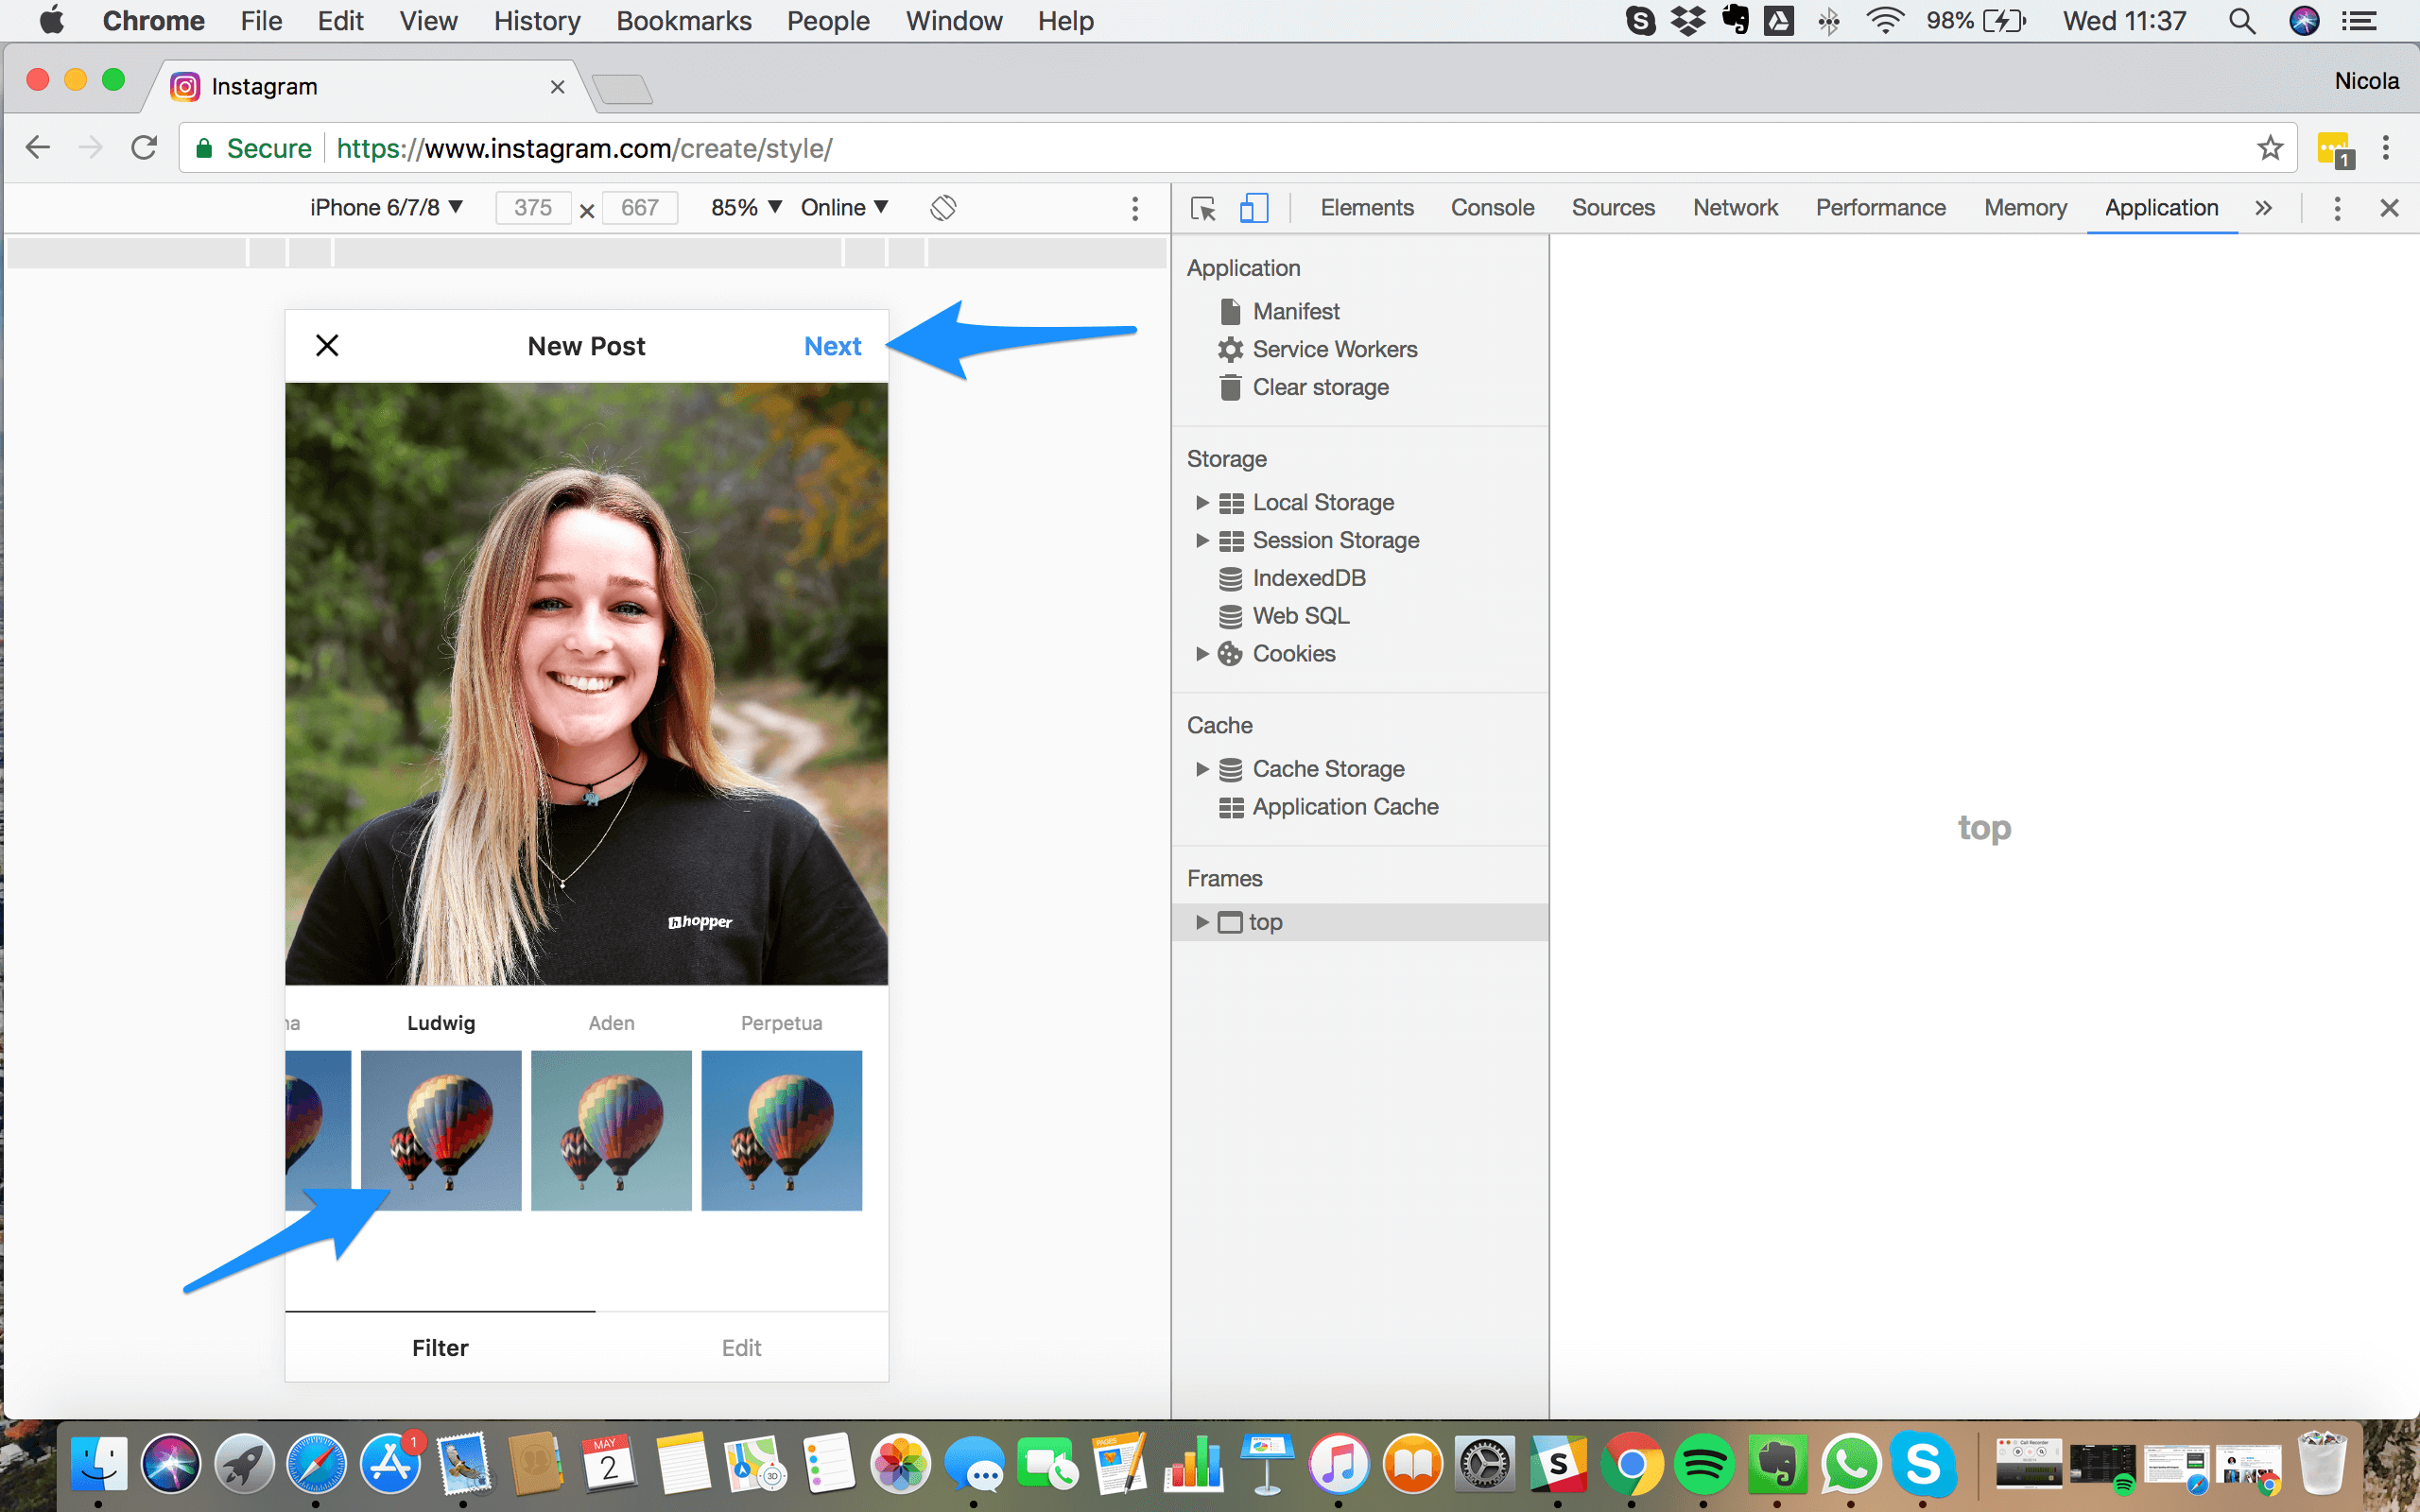
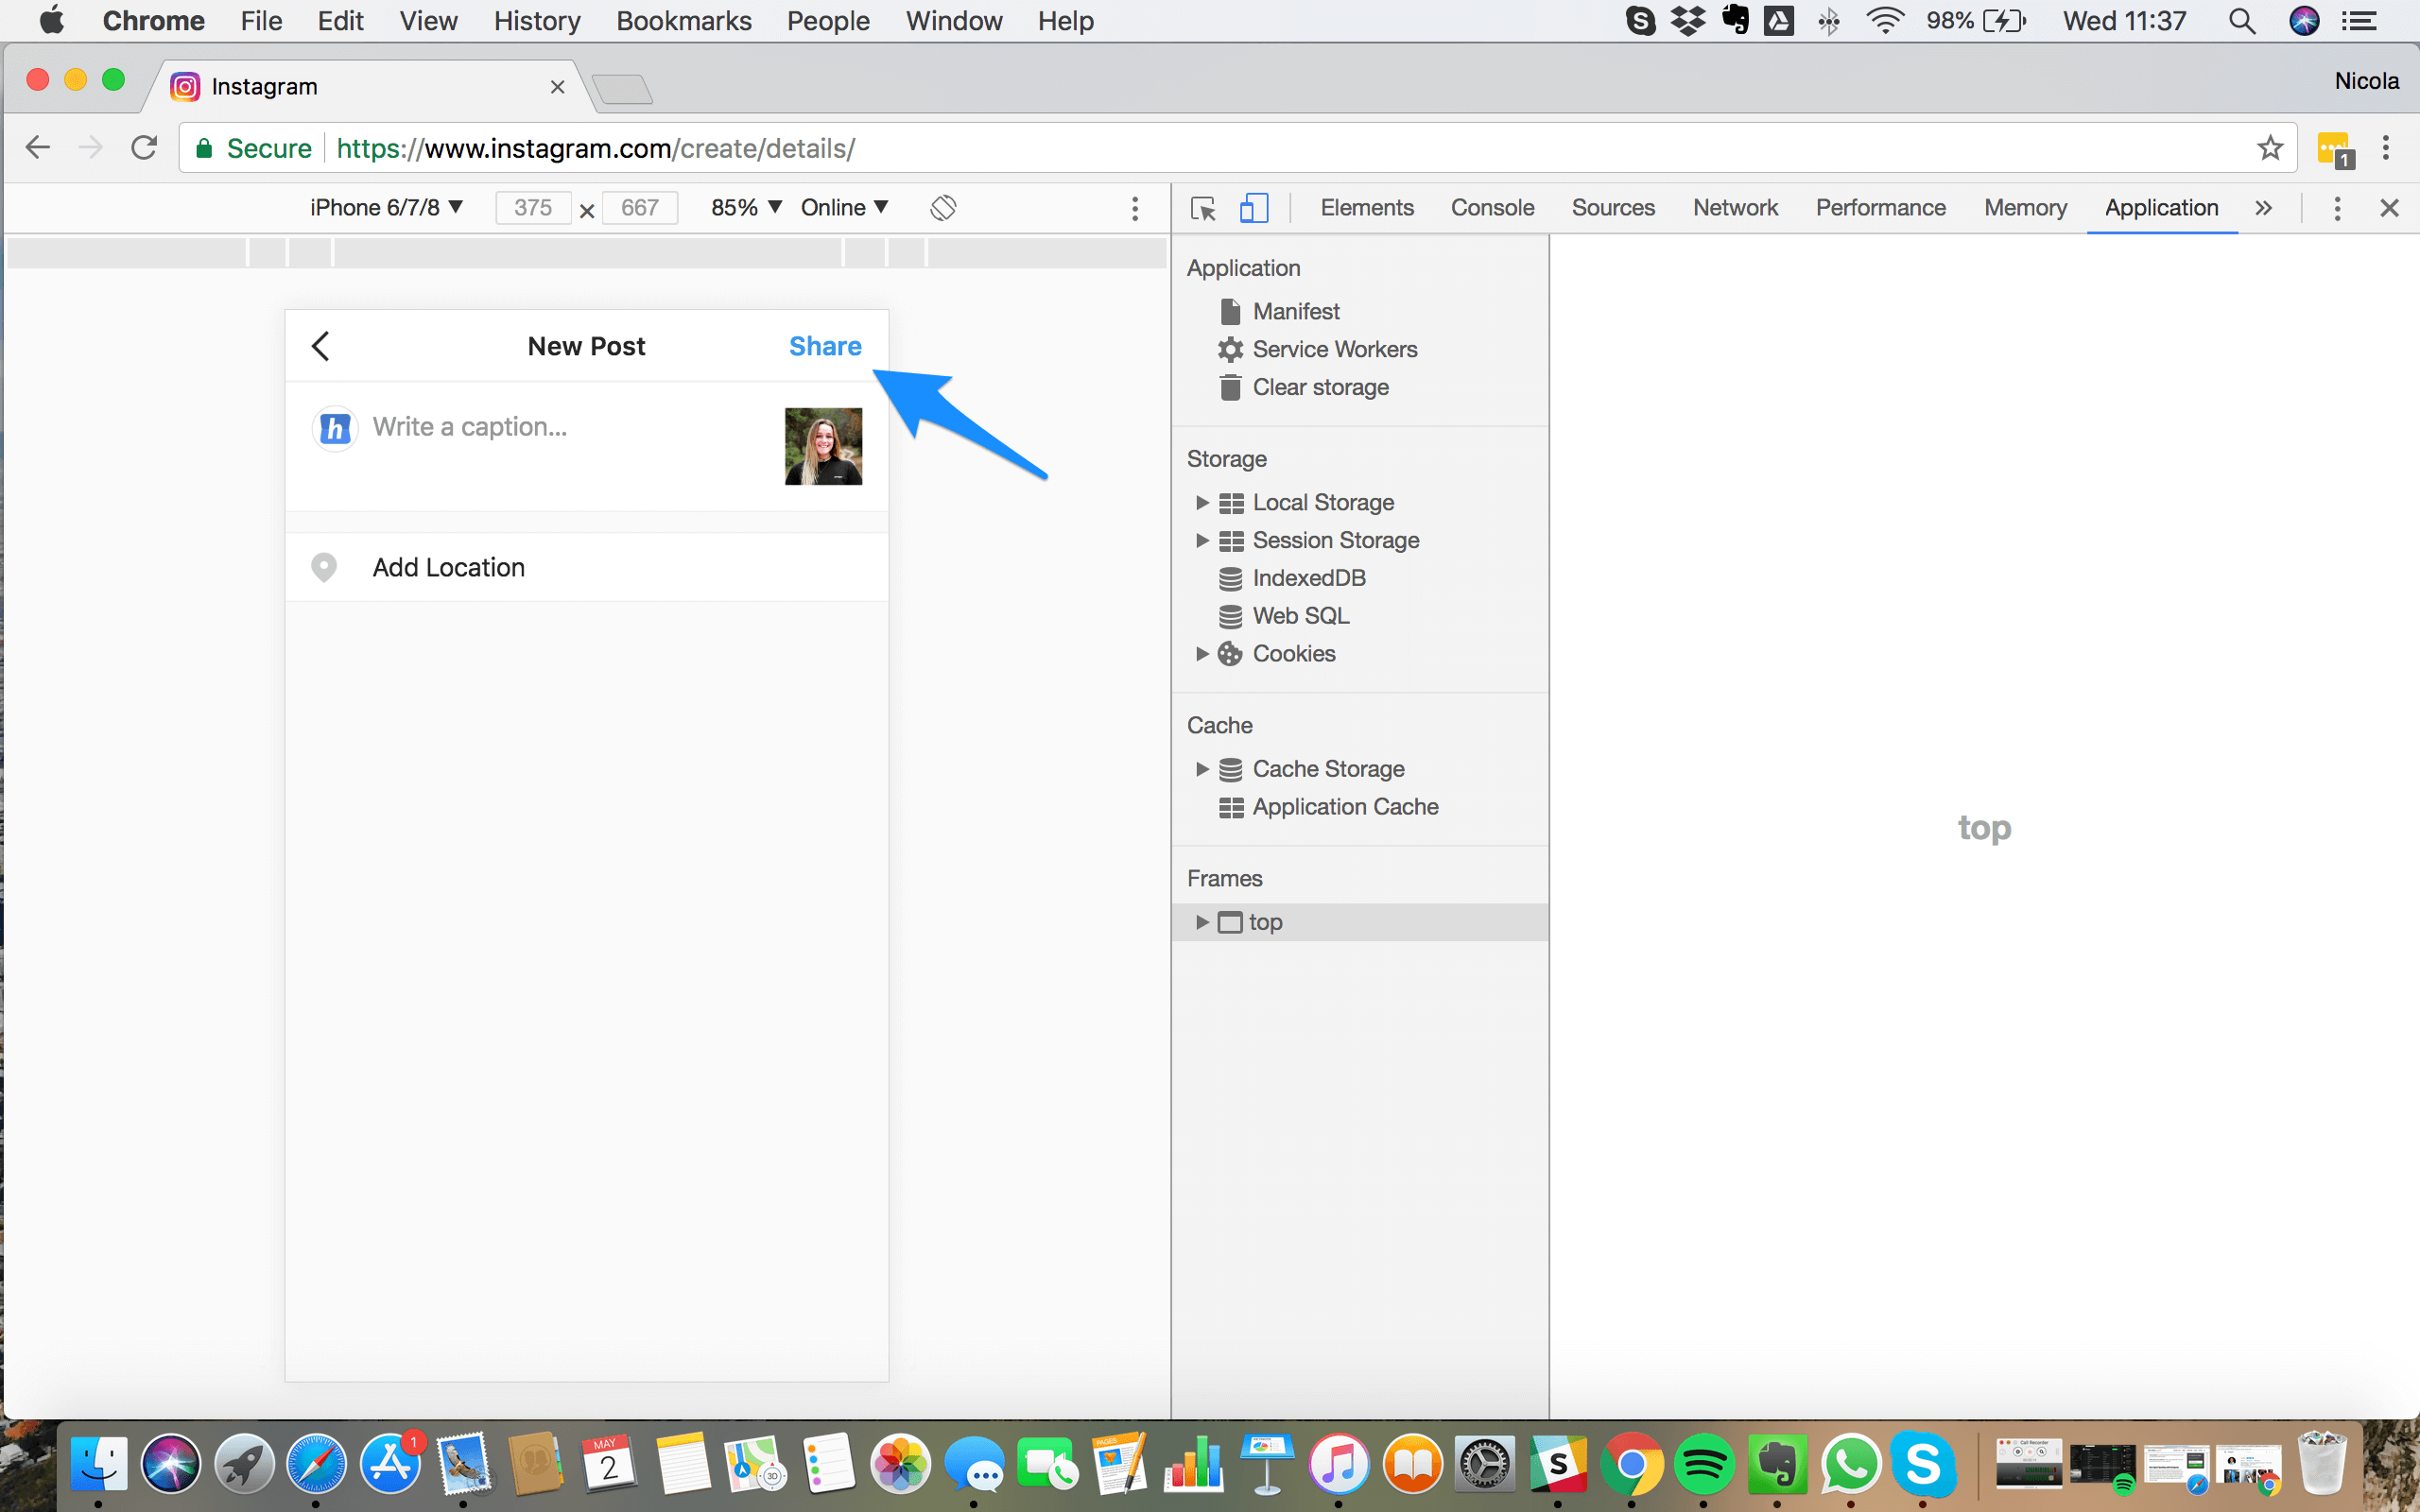
Safari
In order to change the user agent on Safari, you must enable the ‘Develop’ menu by going to Safari > Preferences > Advanced and enabling the option ‘Show Develop menu in menu bar’.
Once this is done you can follow these steps…
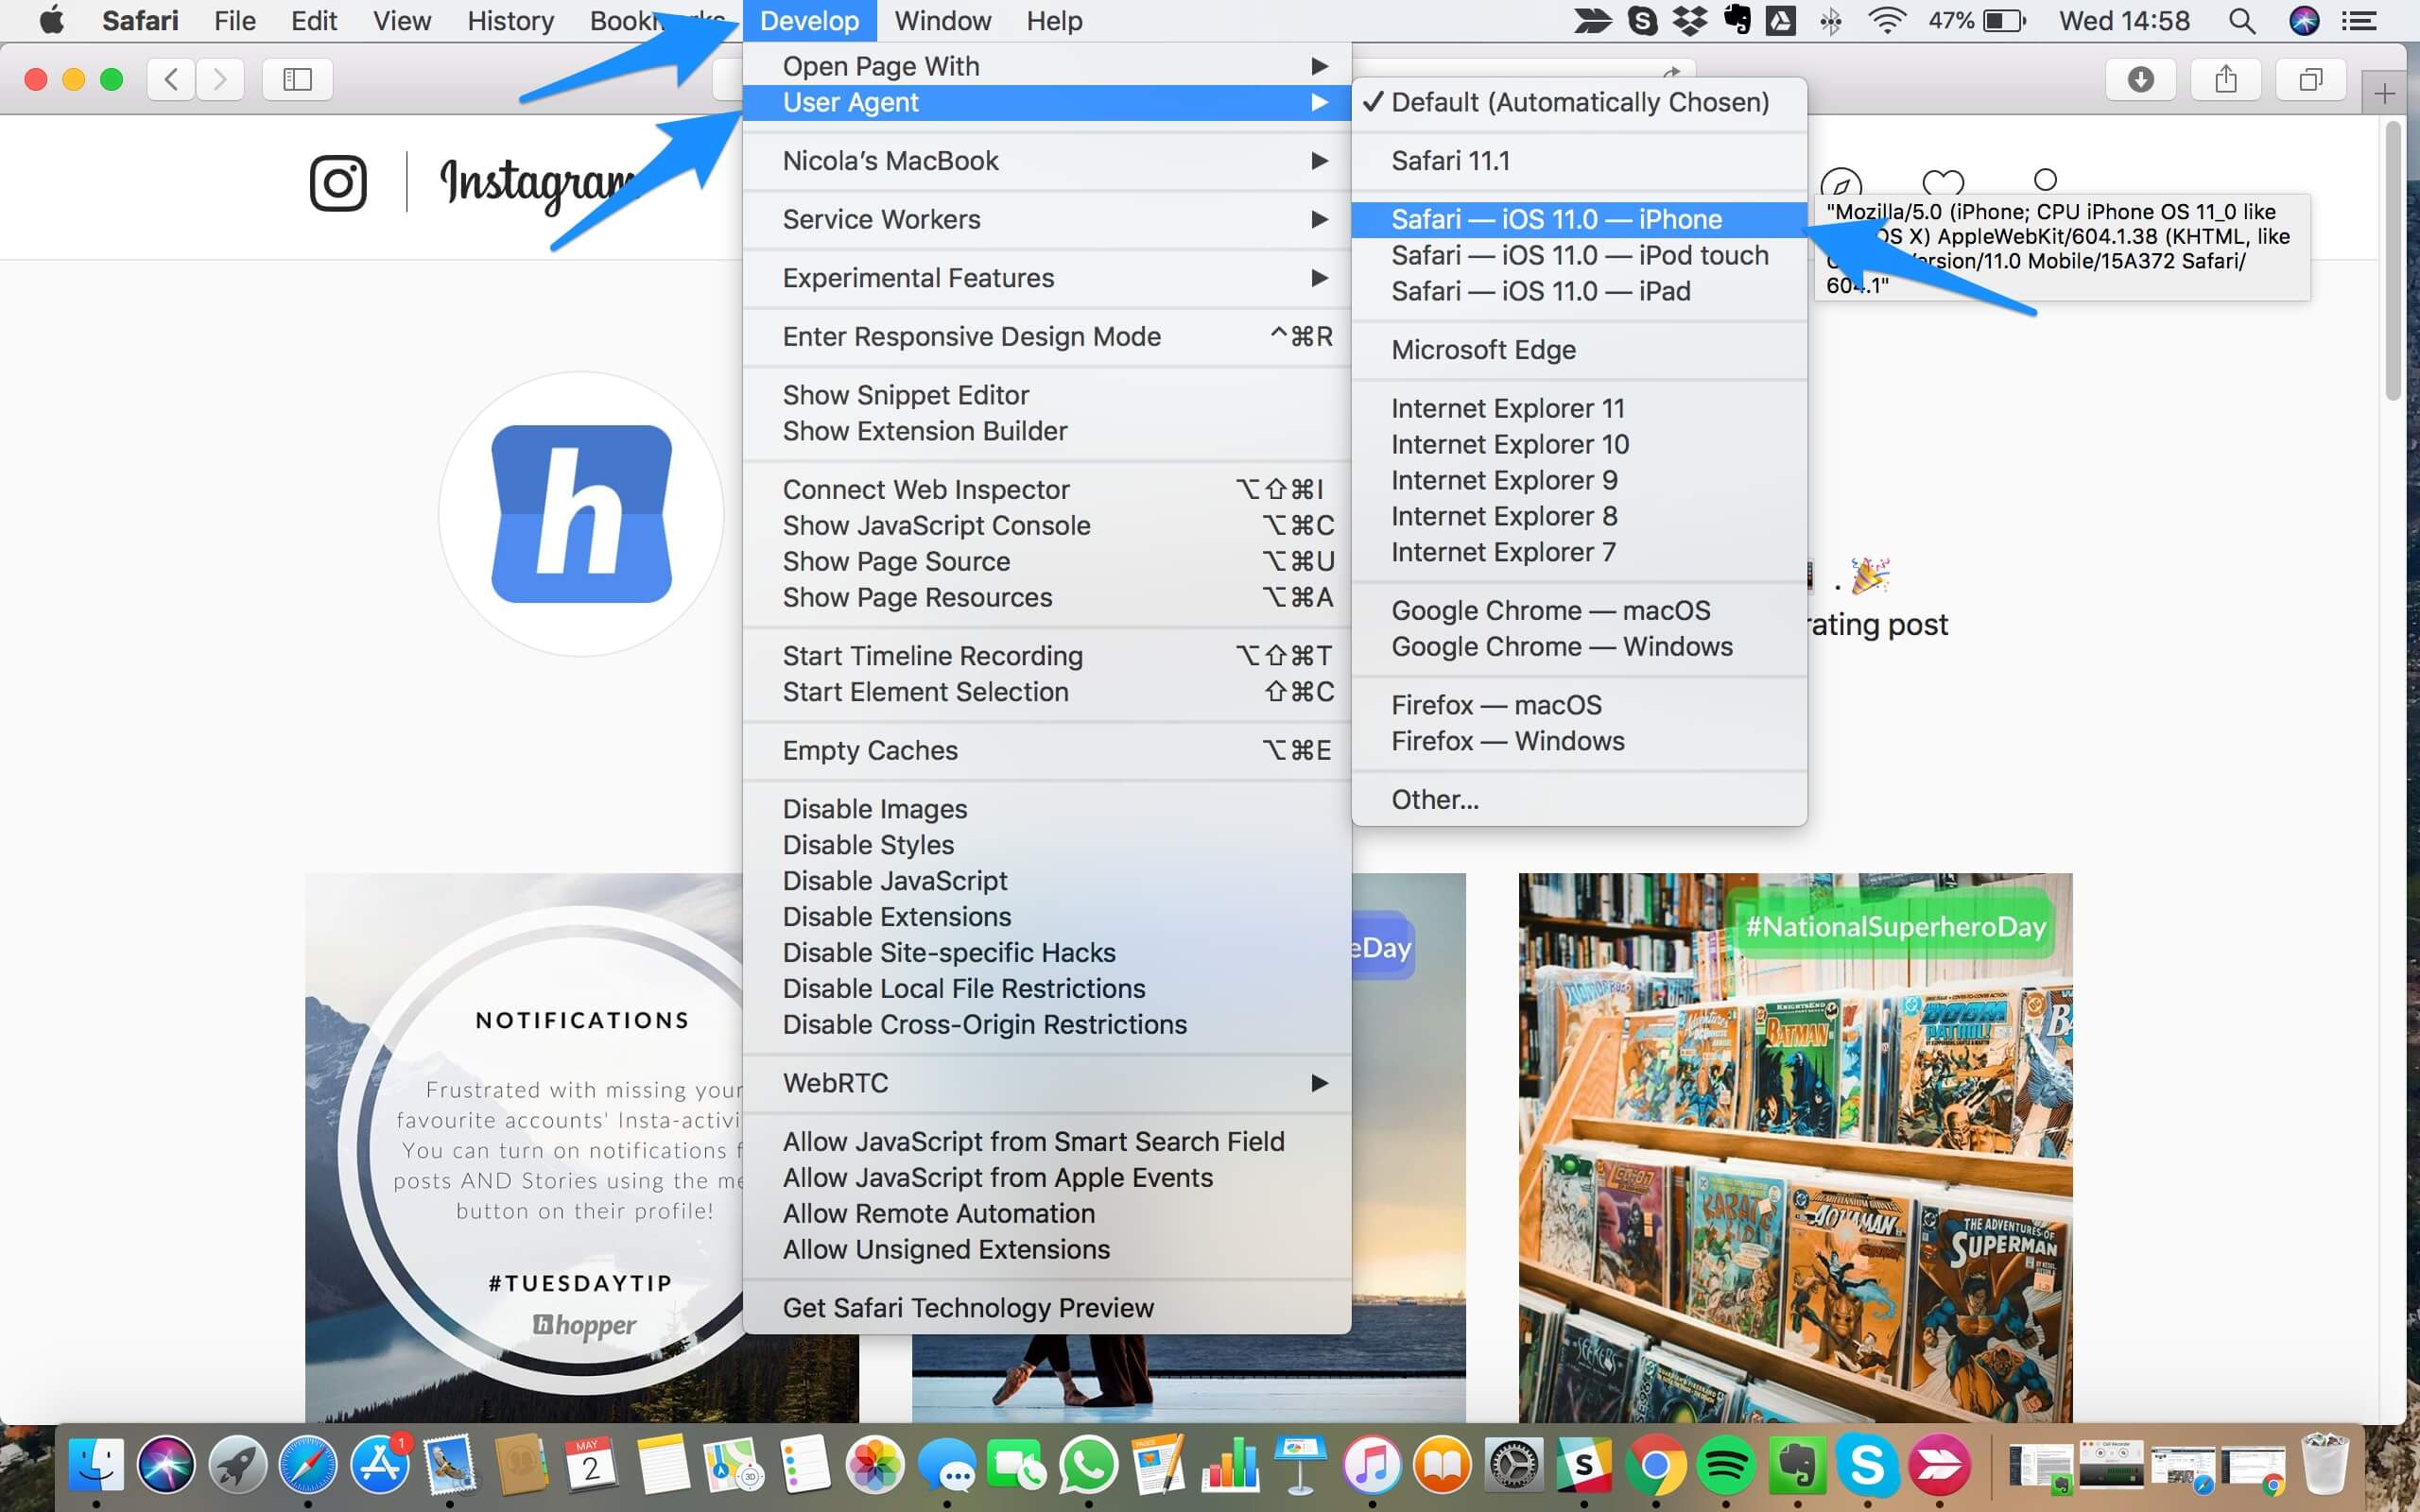
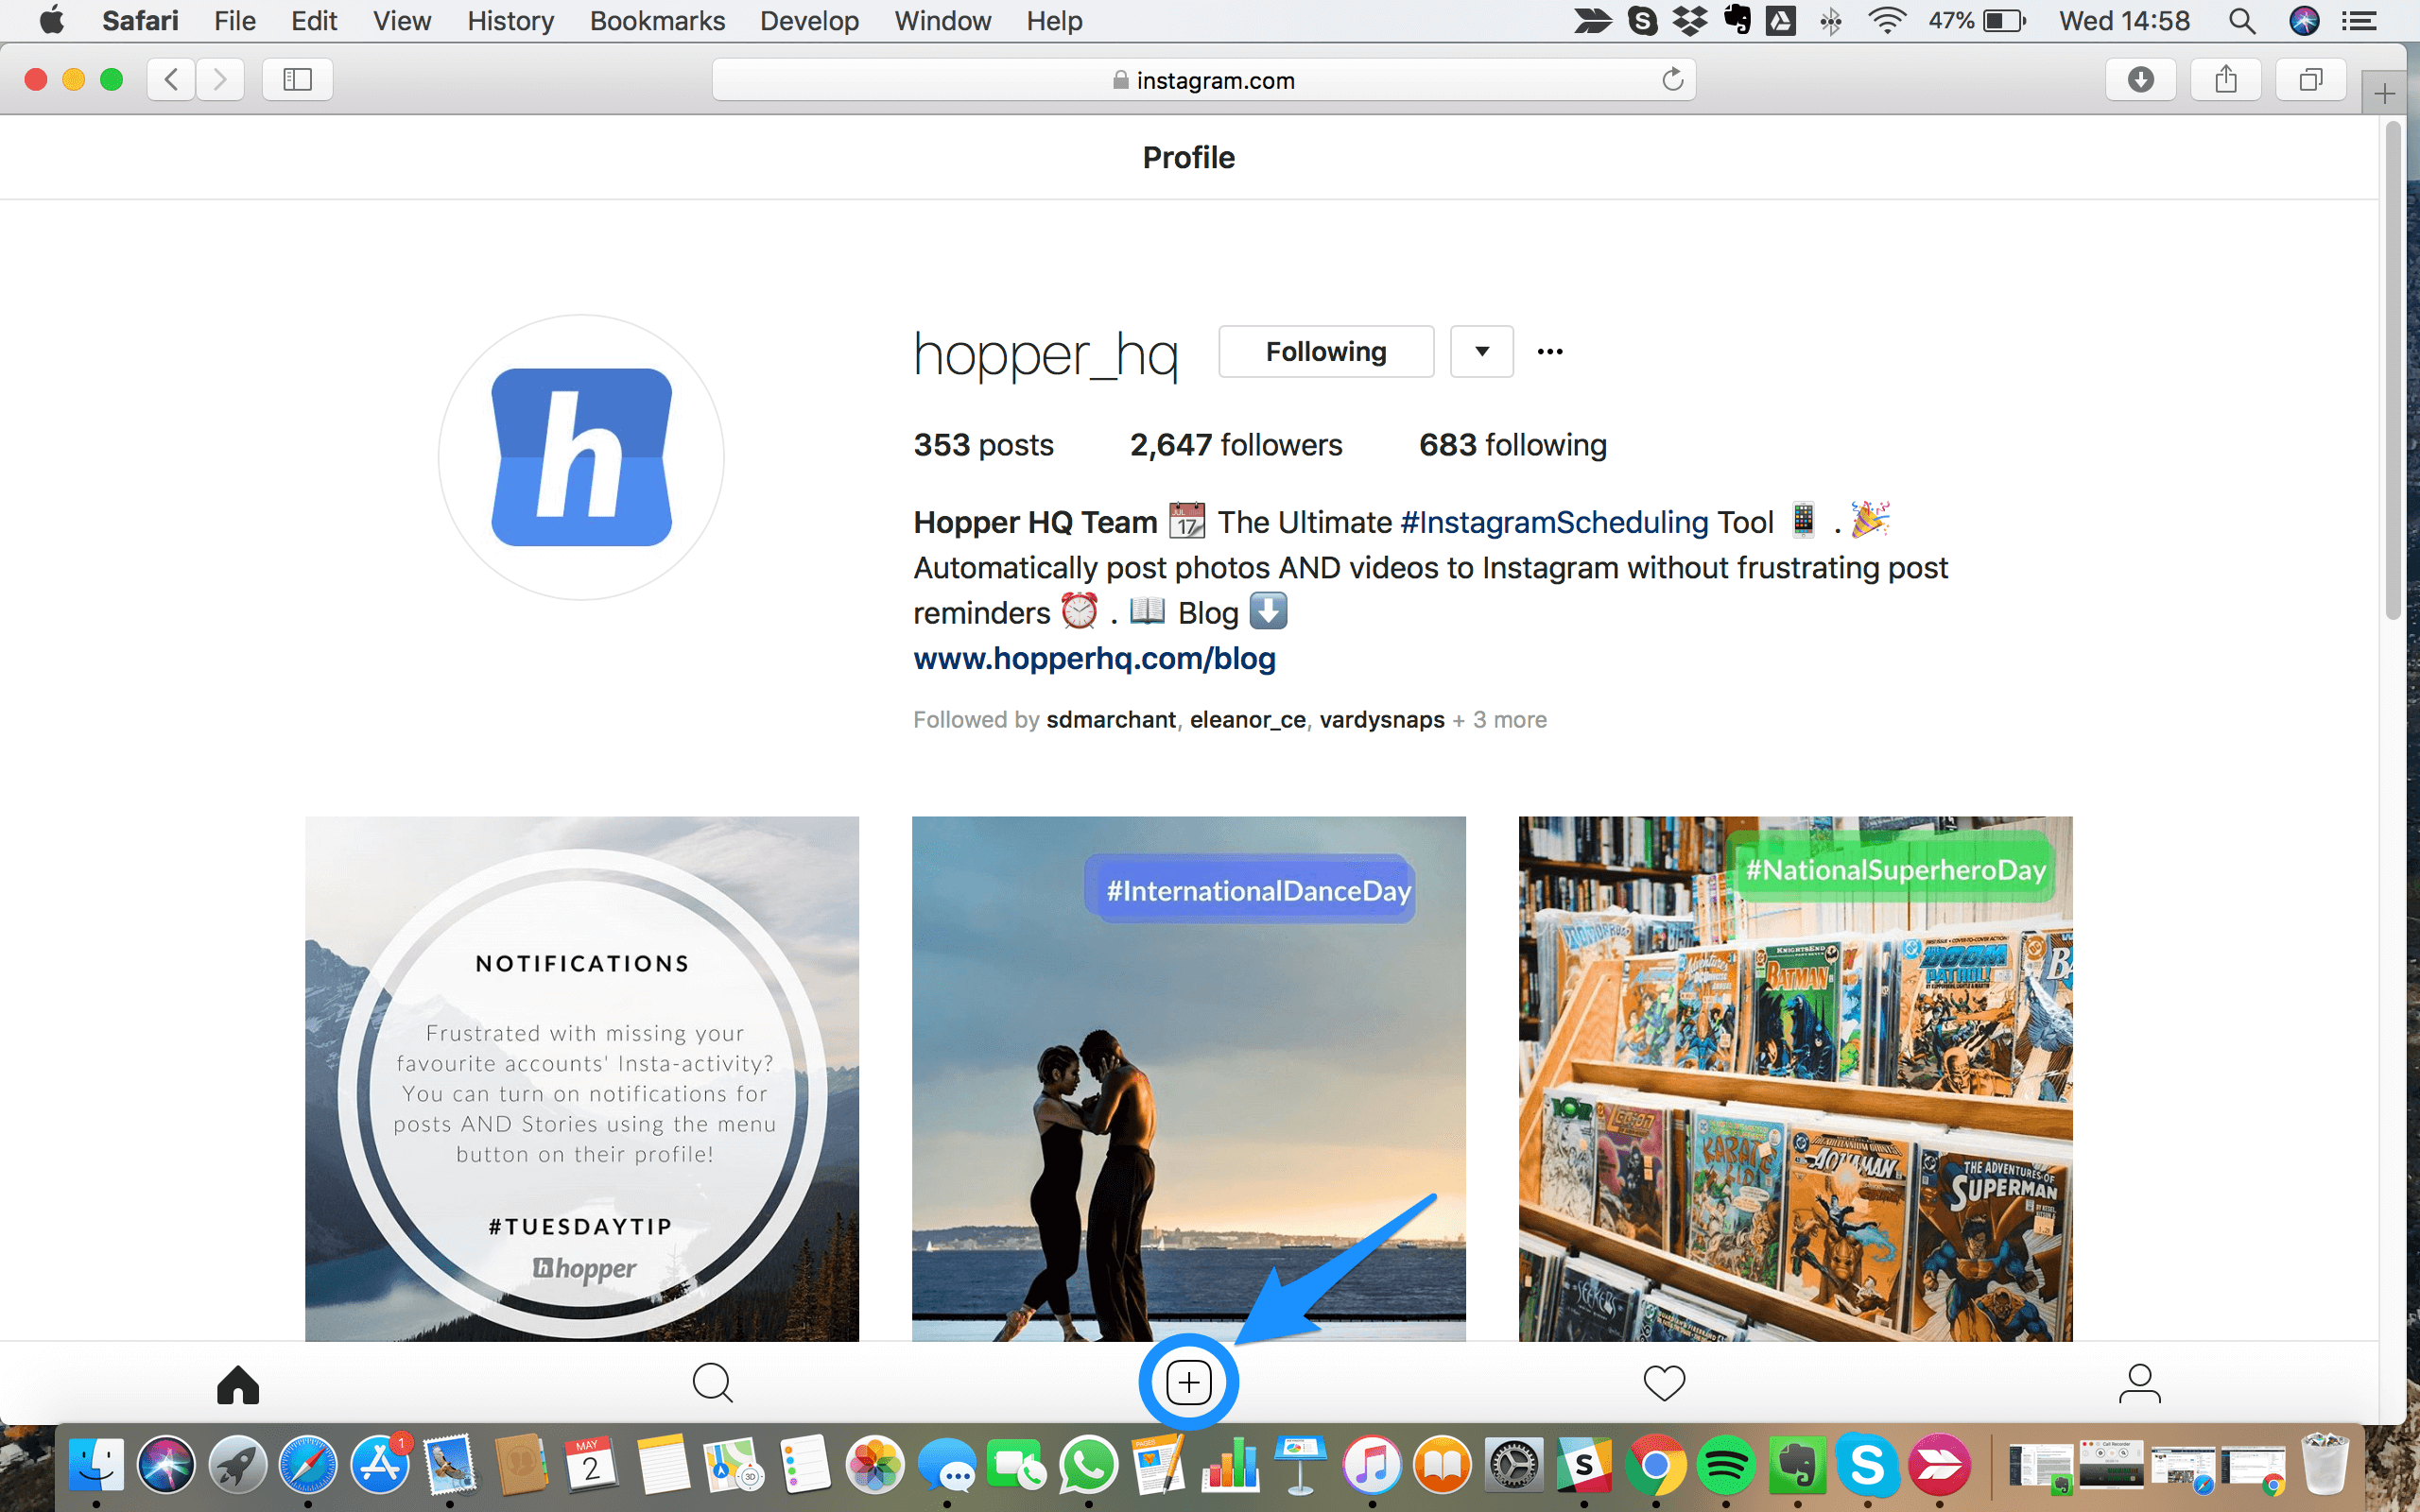
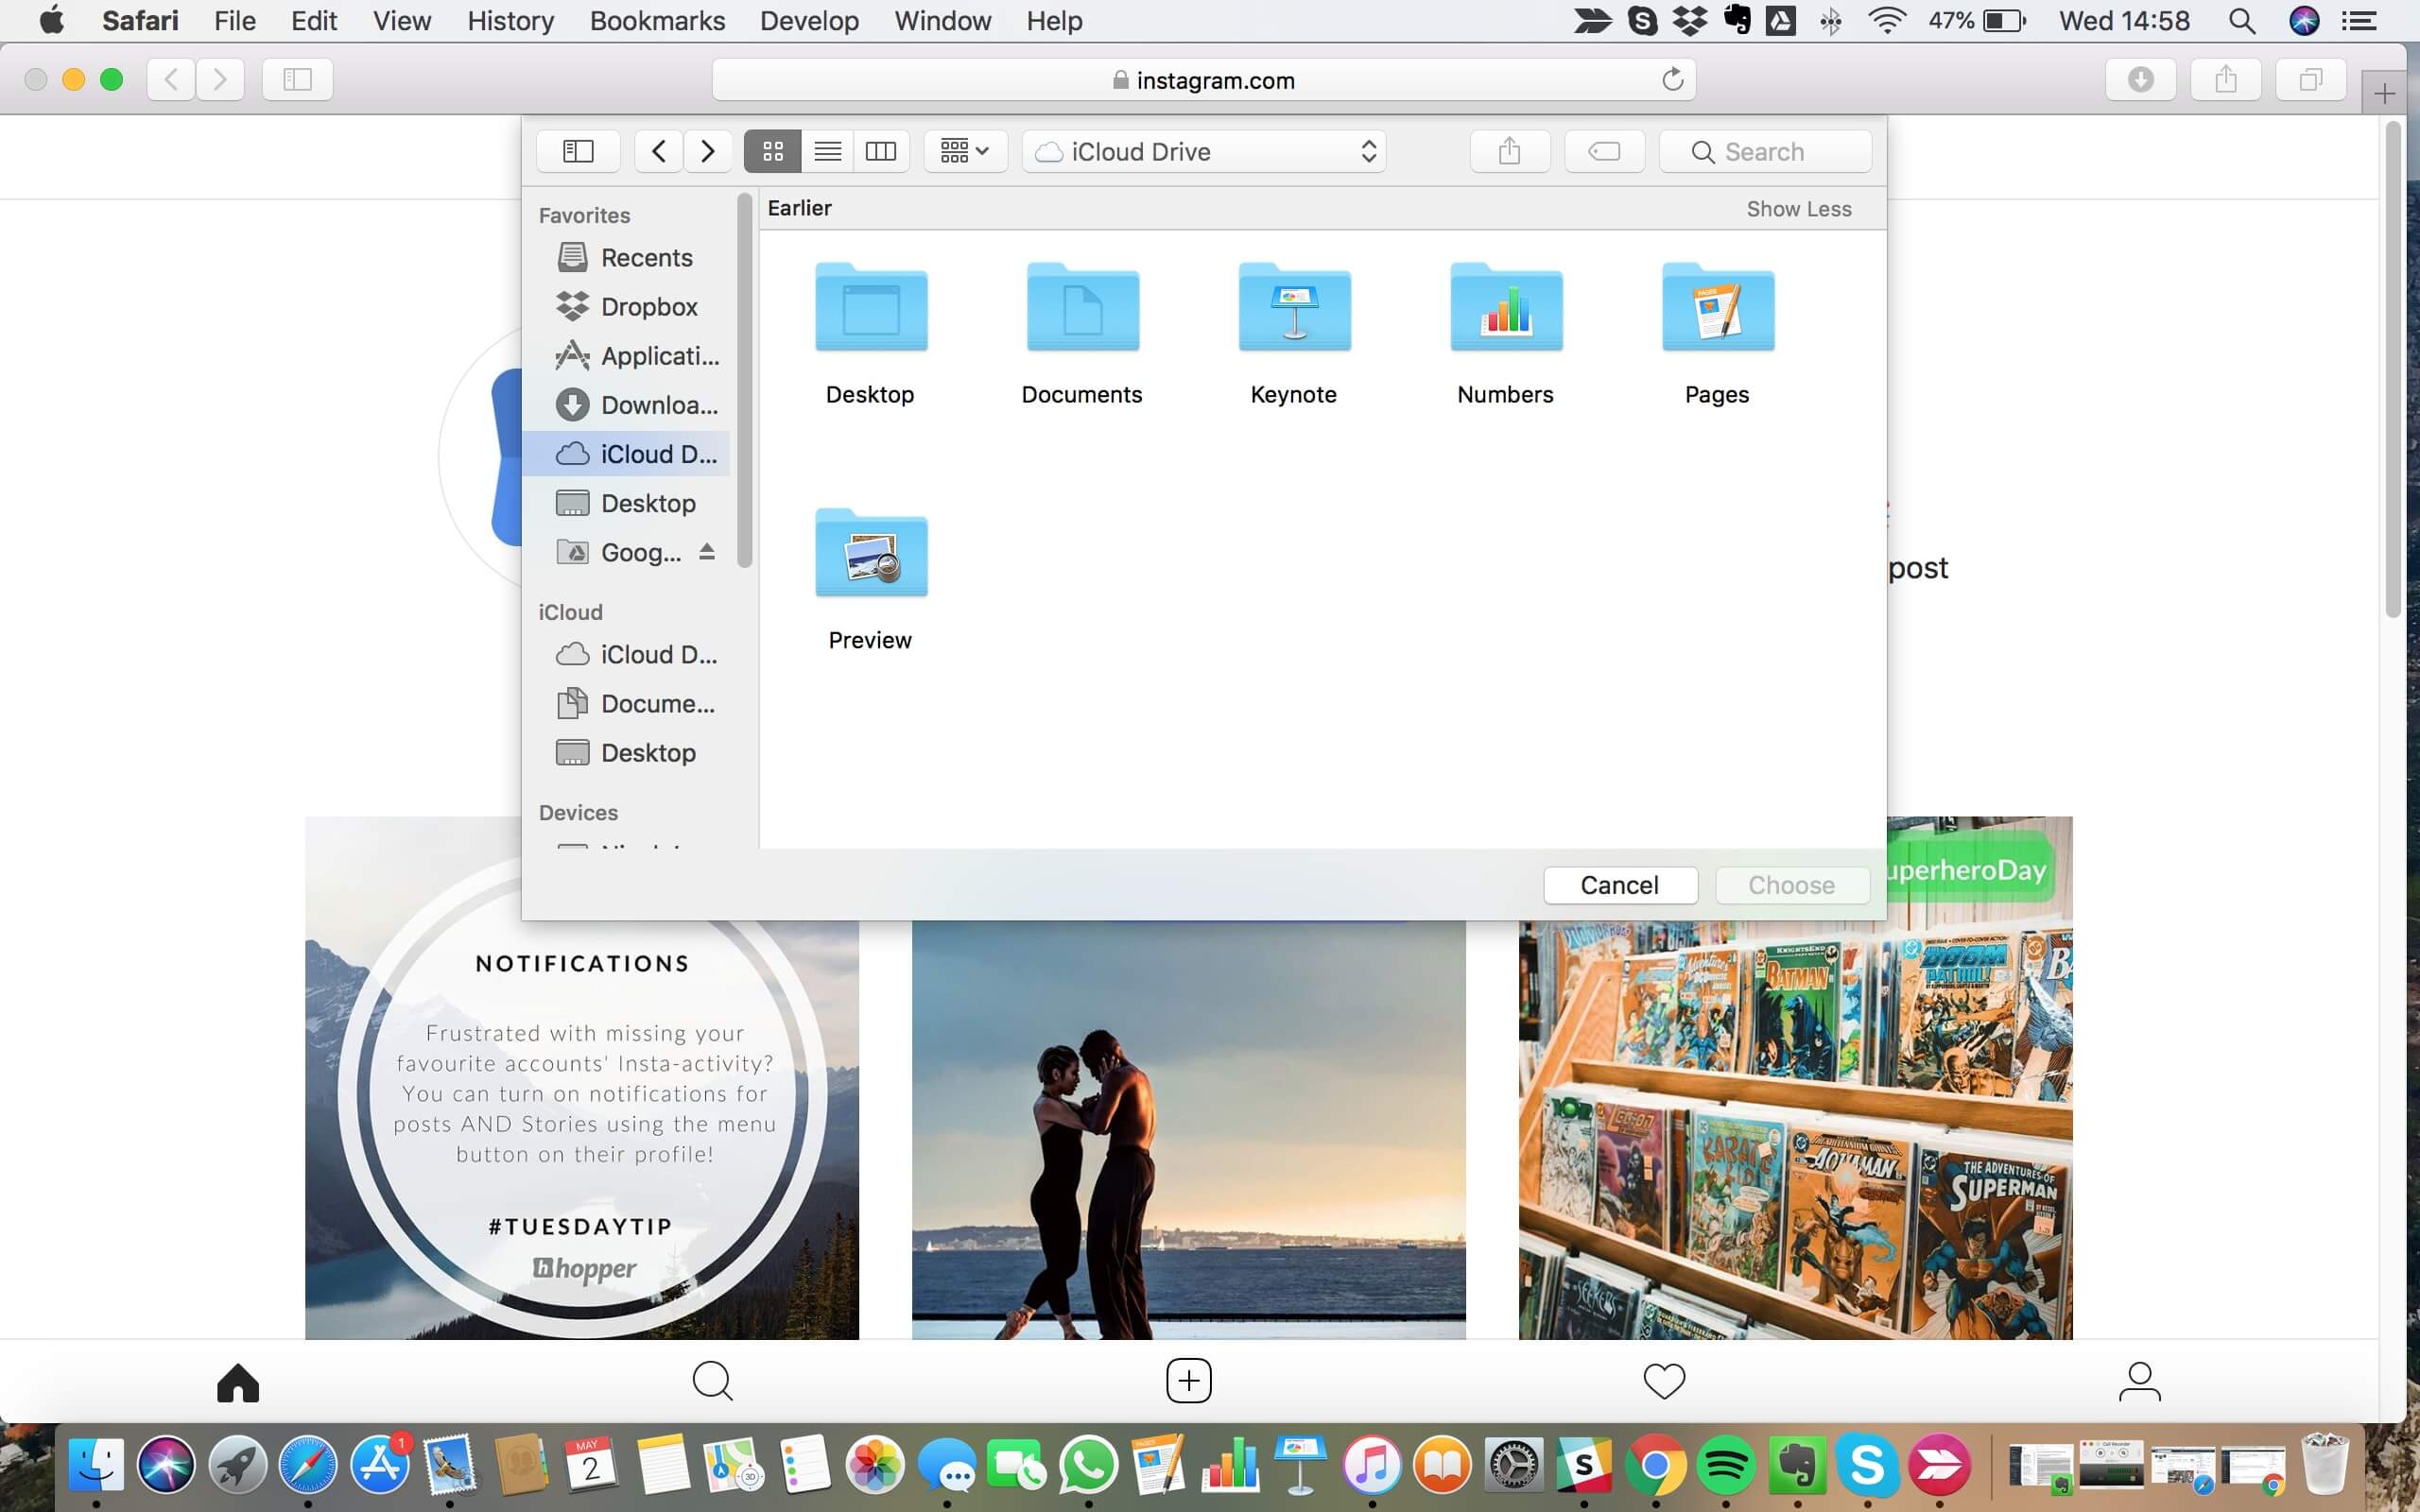
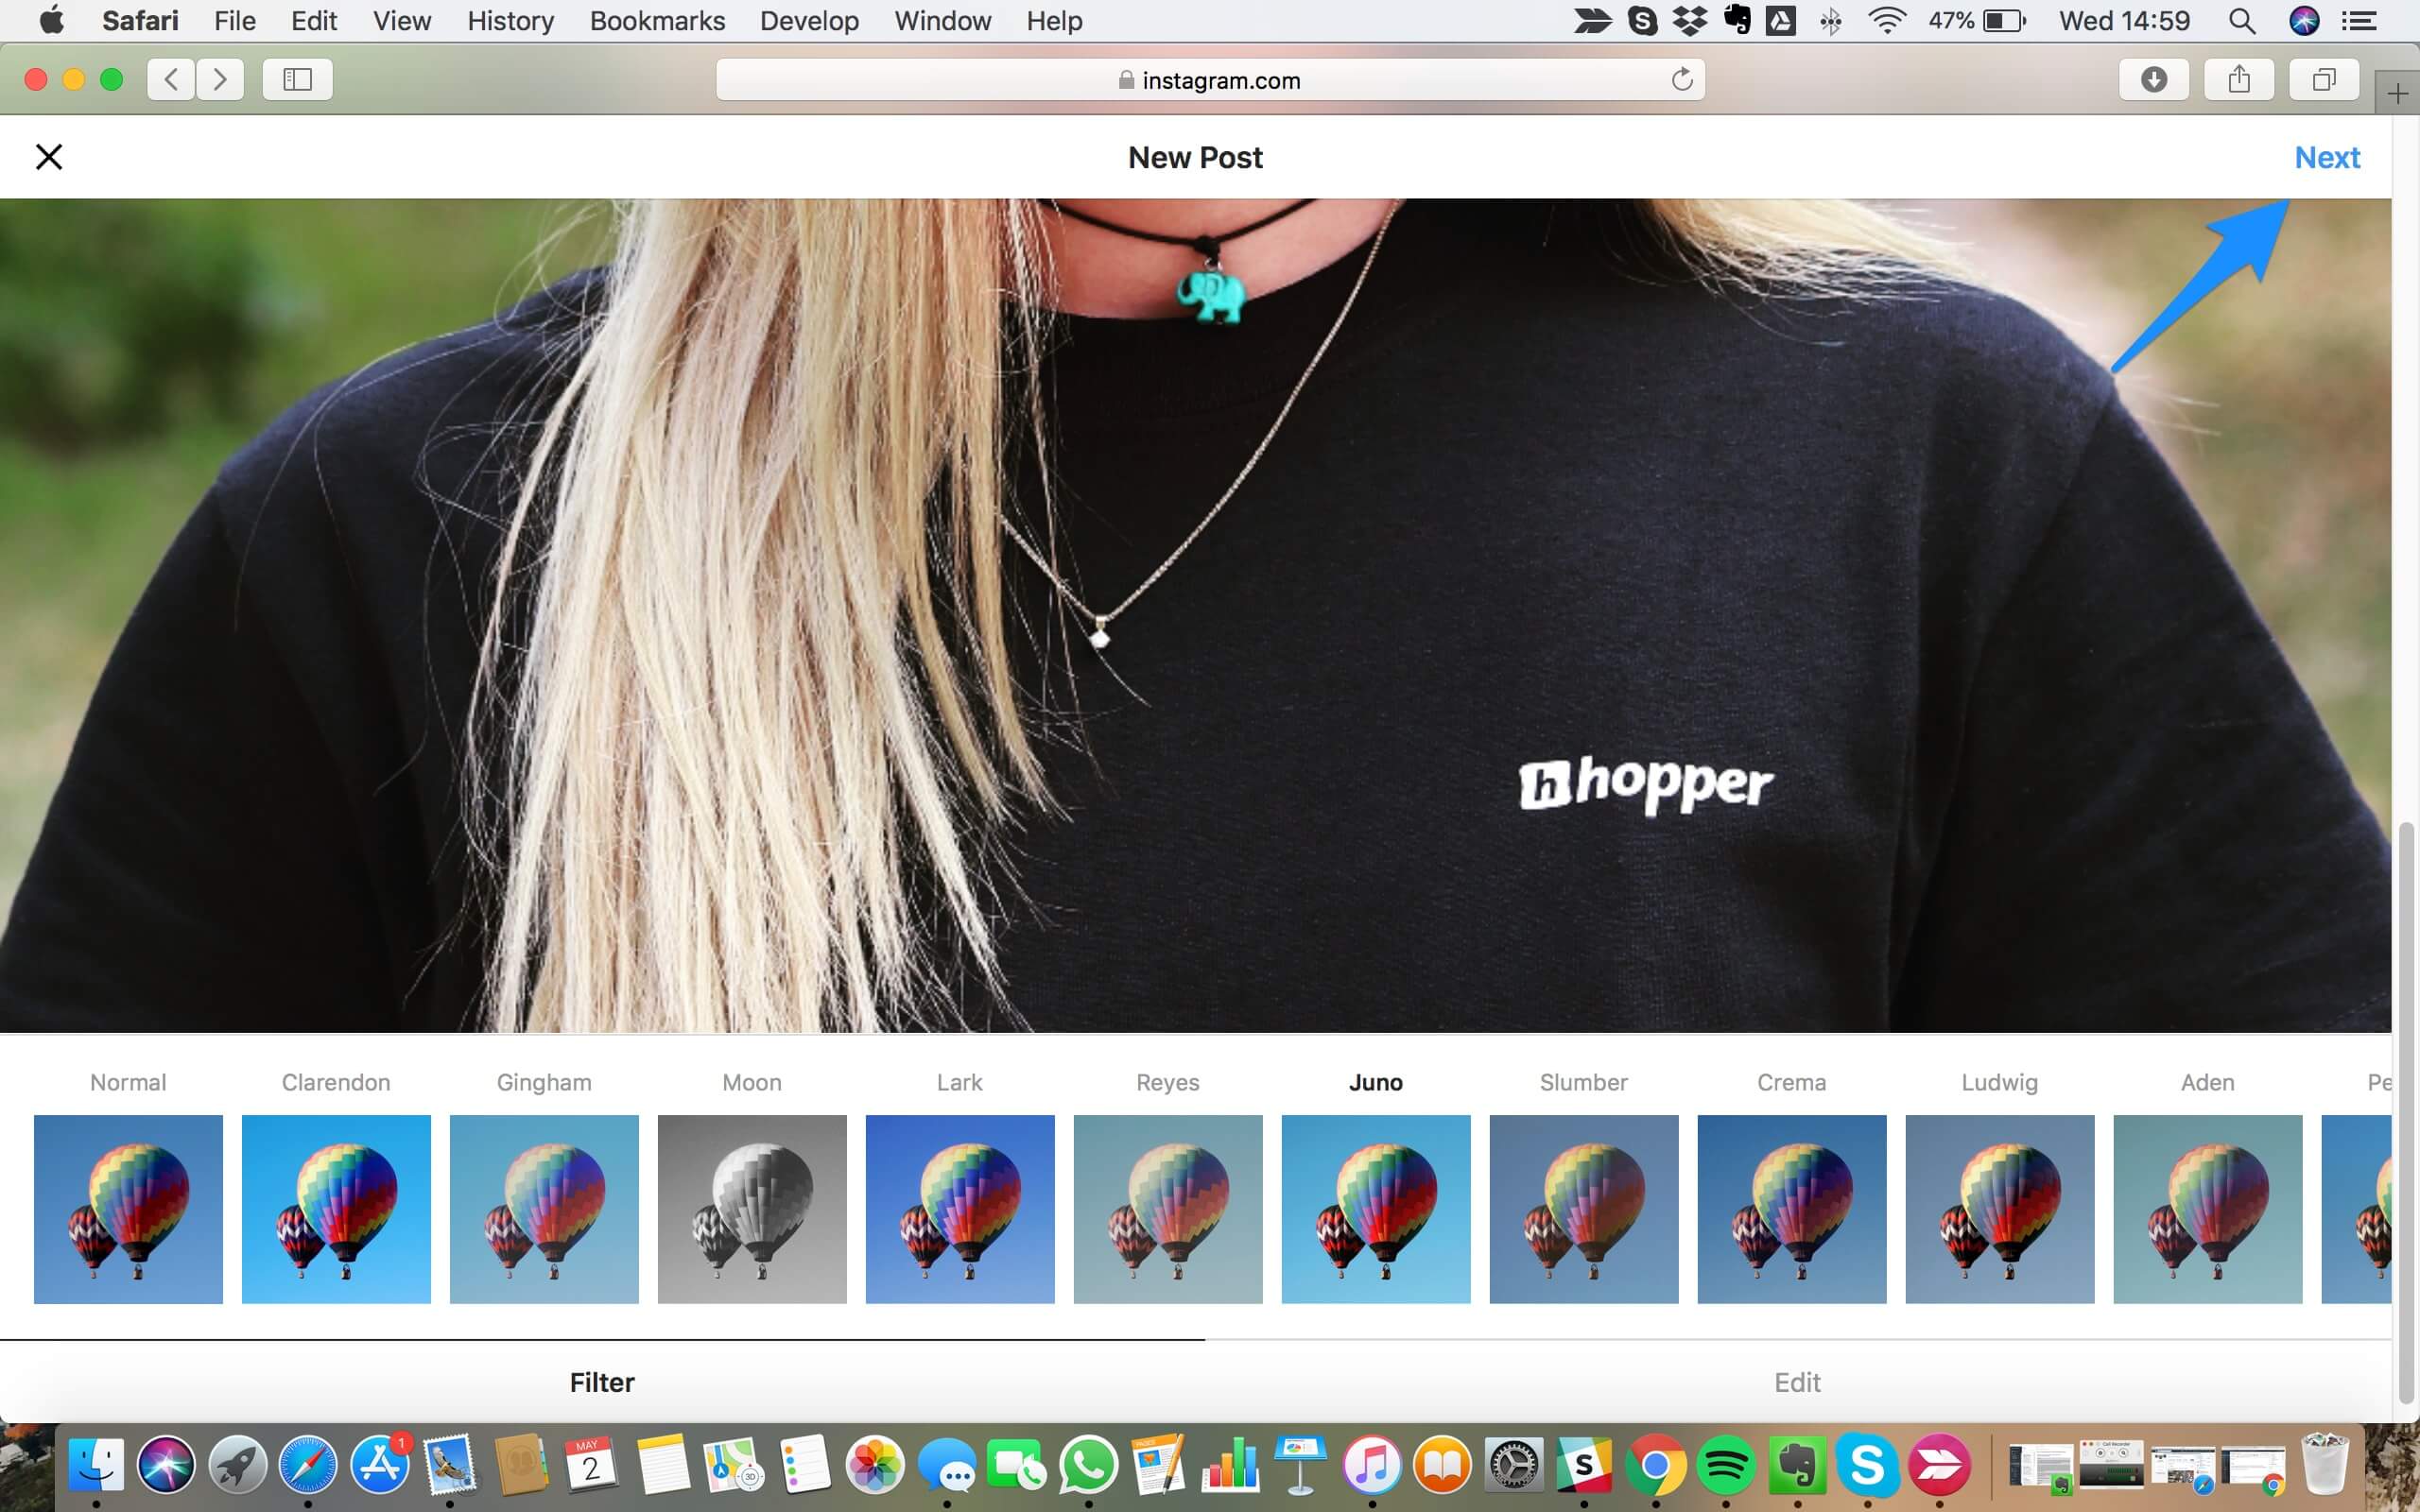
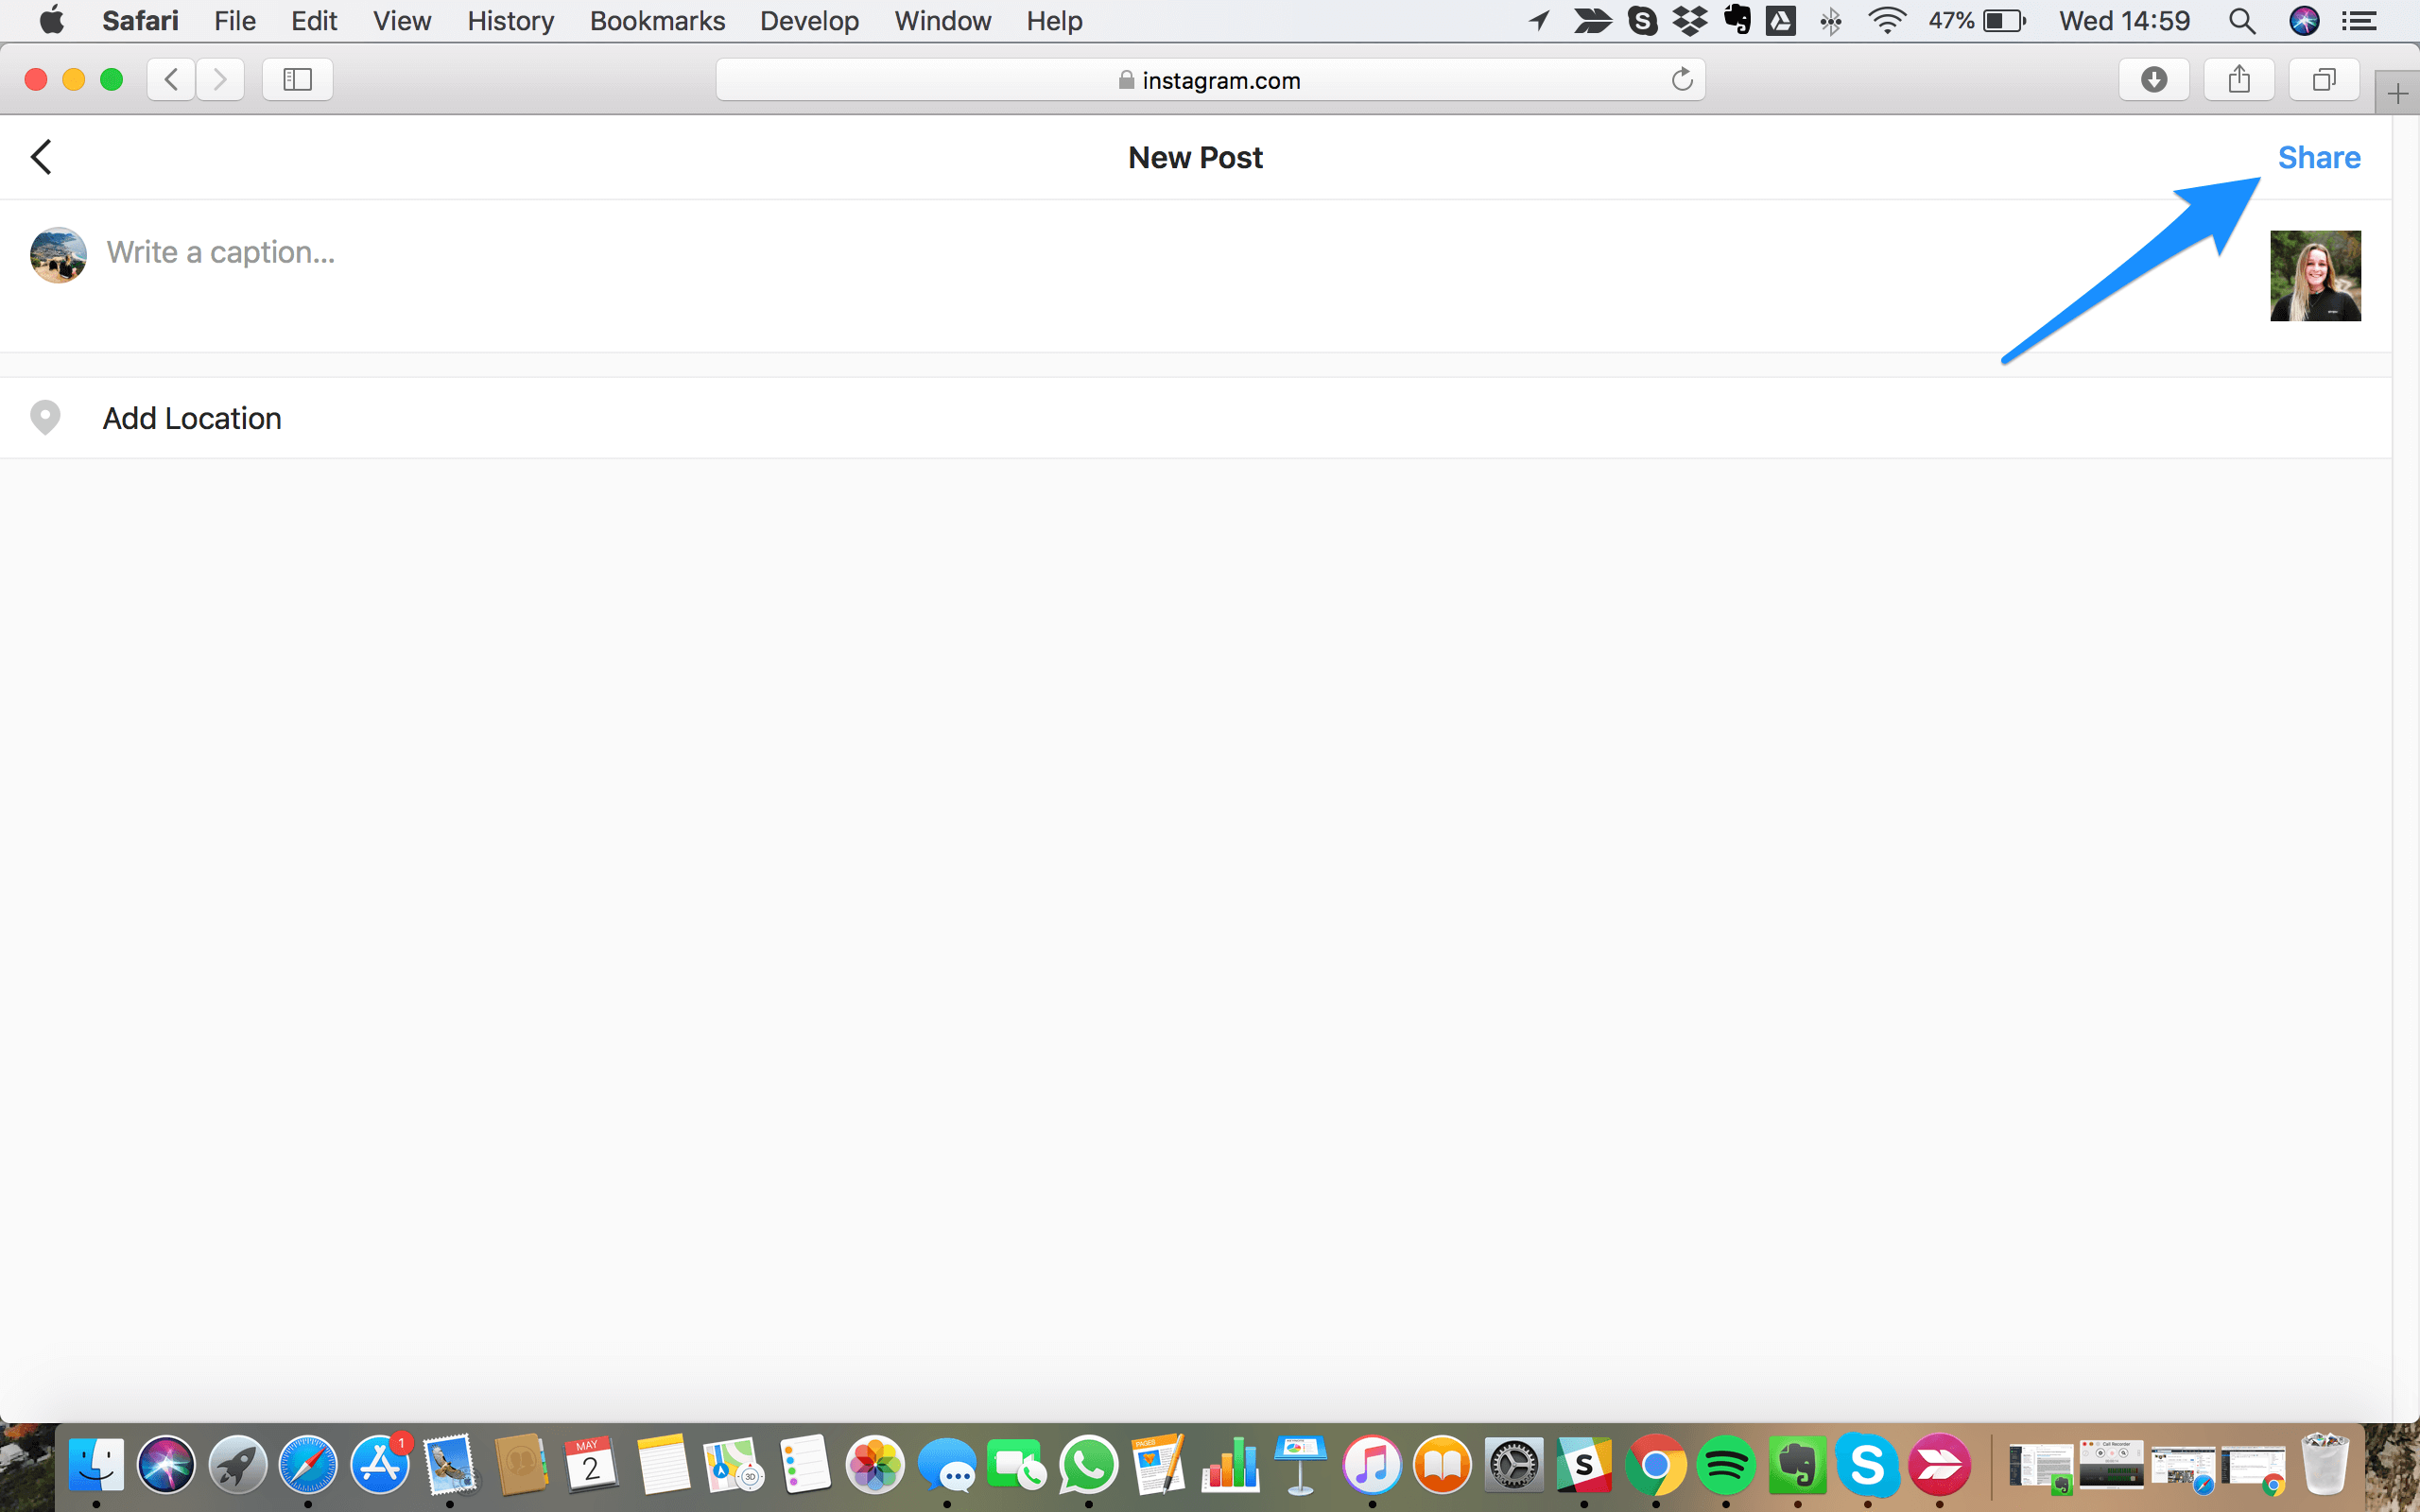
How To Upload To Instagram From PC
If you are running Chrome on a Windows computer, click on the ‘three dots’ icon on the top right section of your browser.
Click on ‘More tools’ and from the dropdown options, pick ‘Developer tools
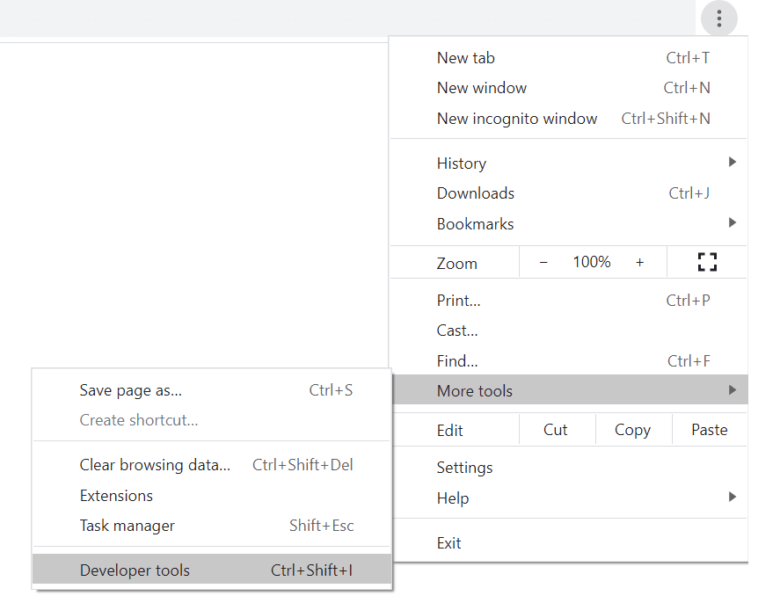
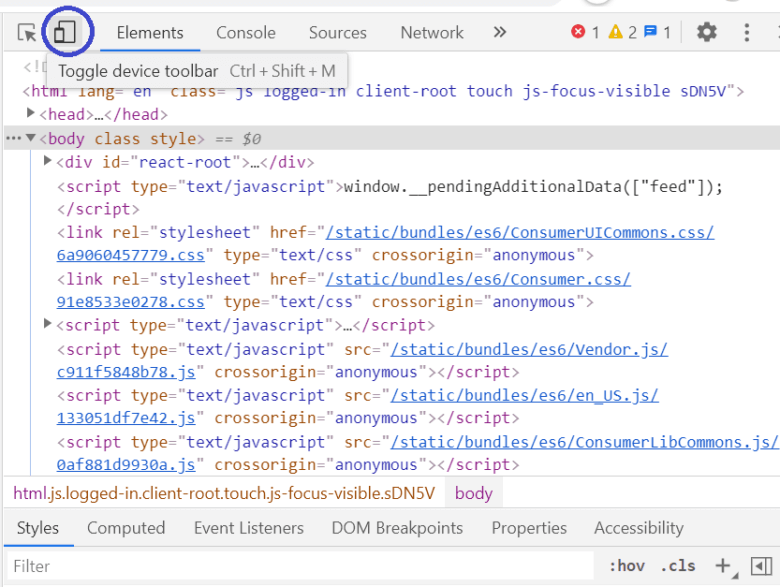
Click on the “Toggle Device Toolbar” option in the console window. You can also press Ctrl+Shift+M
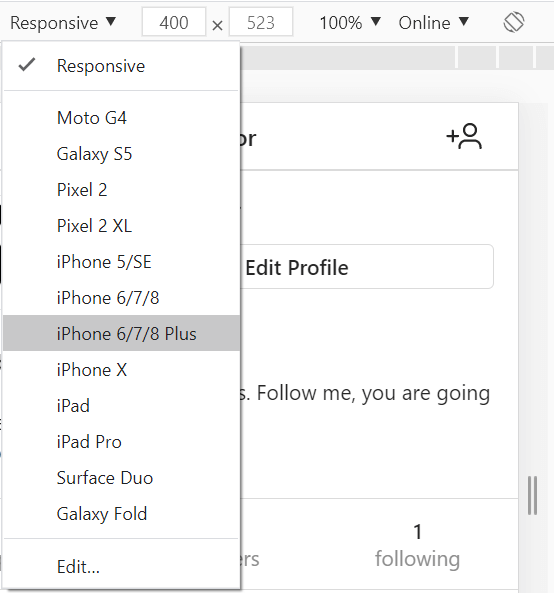
When you do this, you will see the device toolbar popup at the top of your browser window. Here, you can click on the dropdown to pick a mobile device user agent.
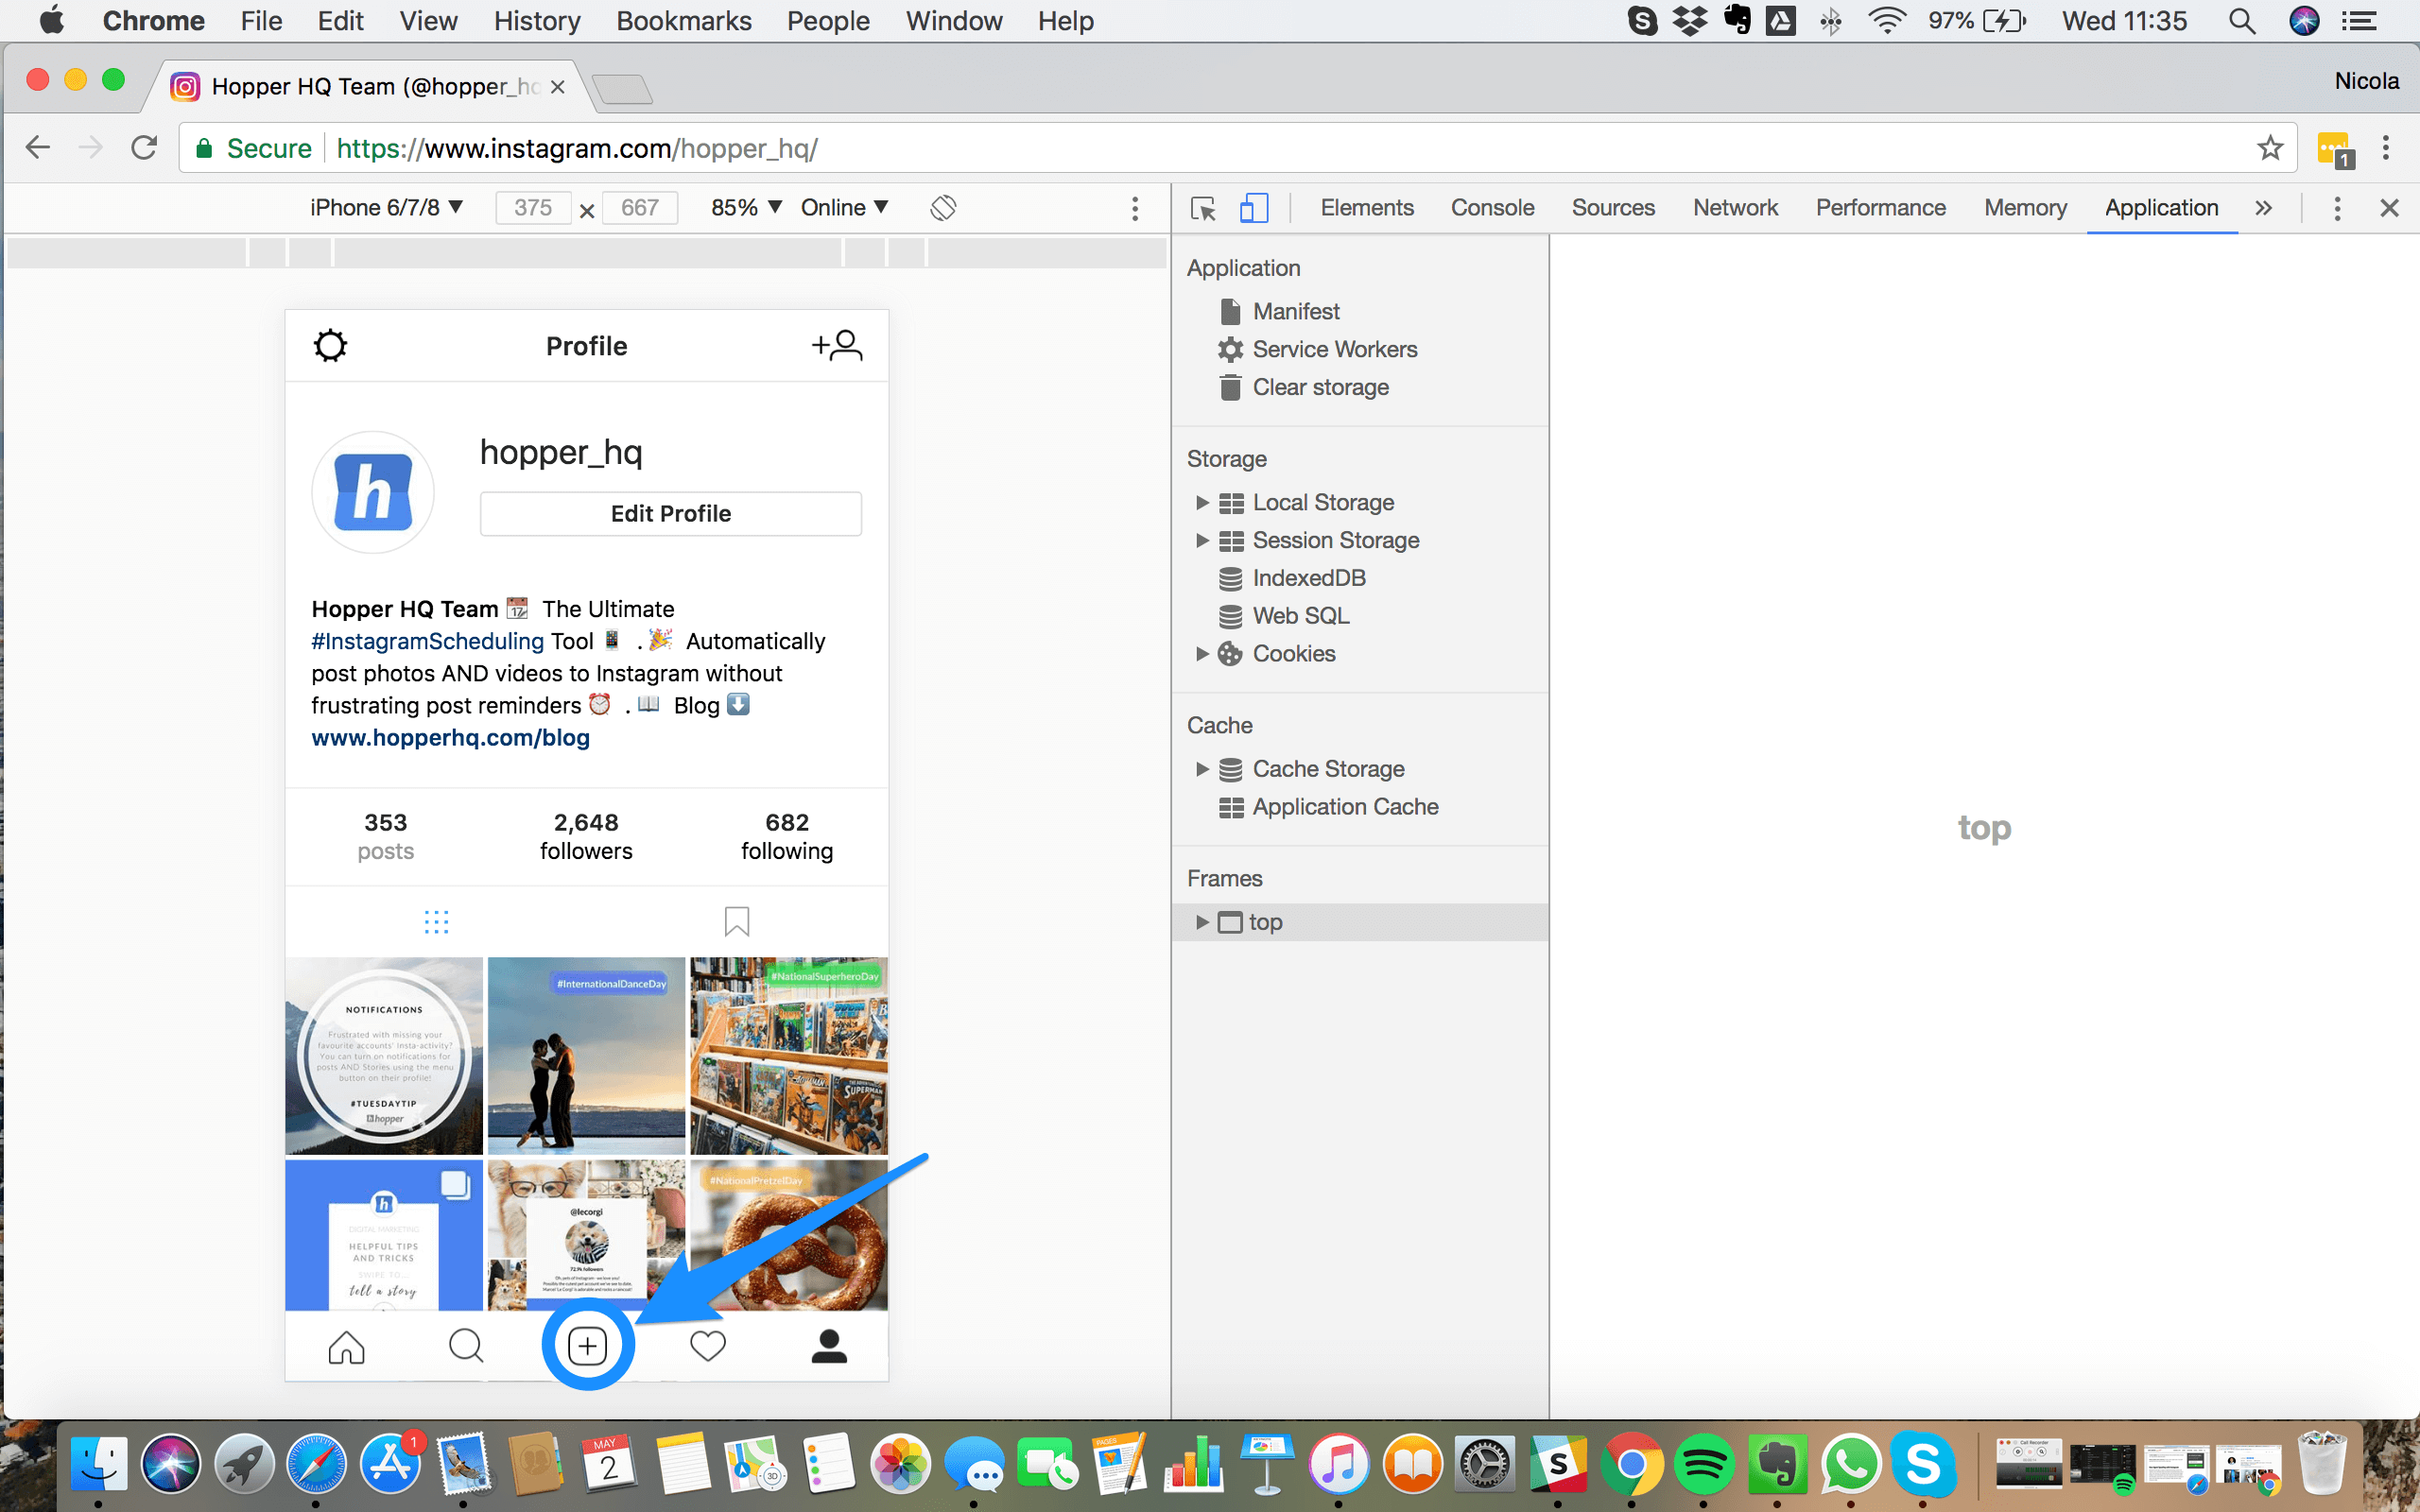
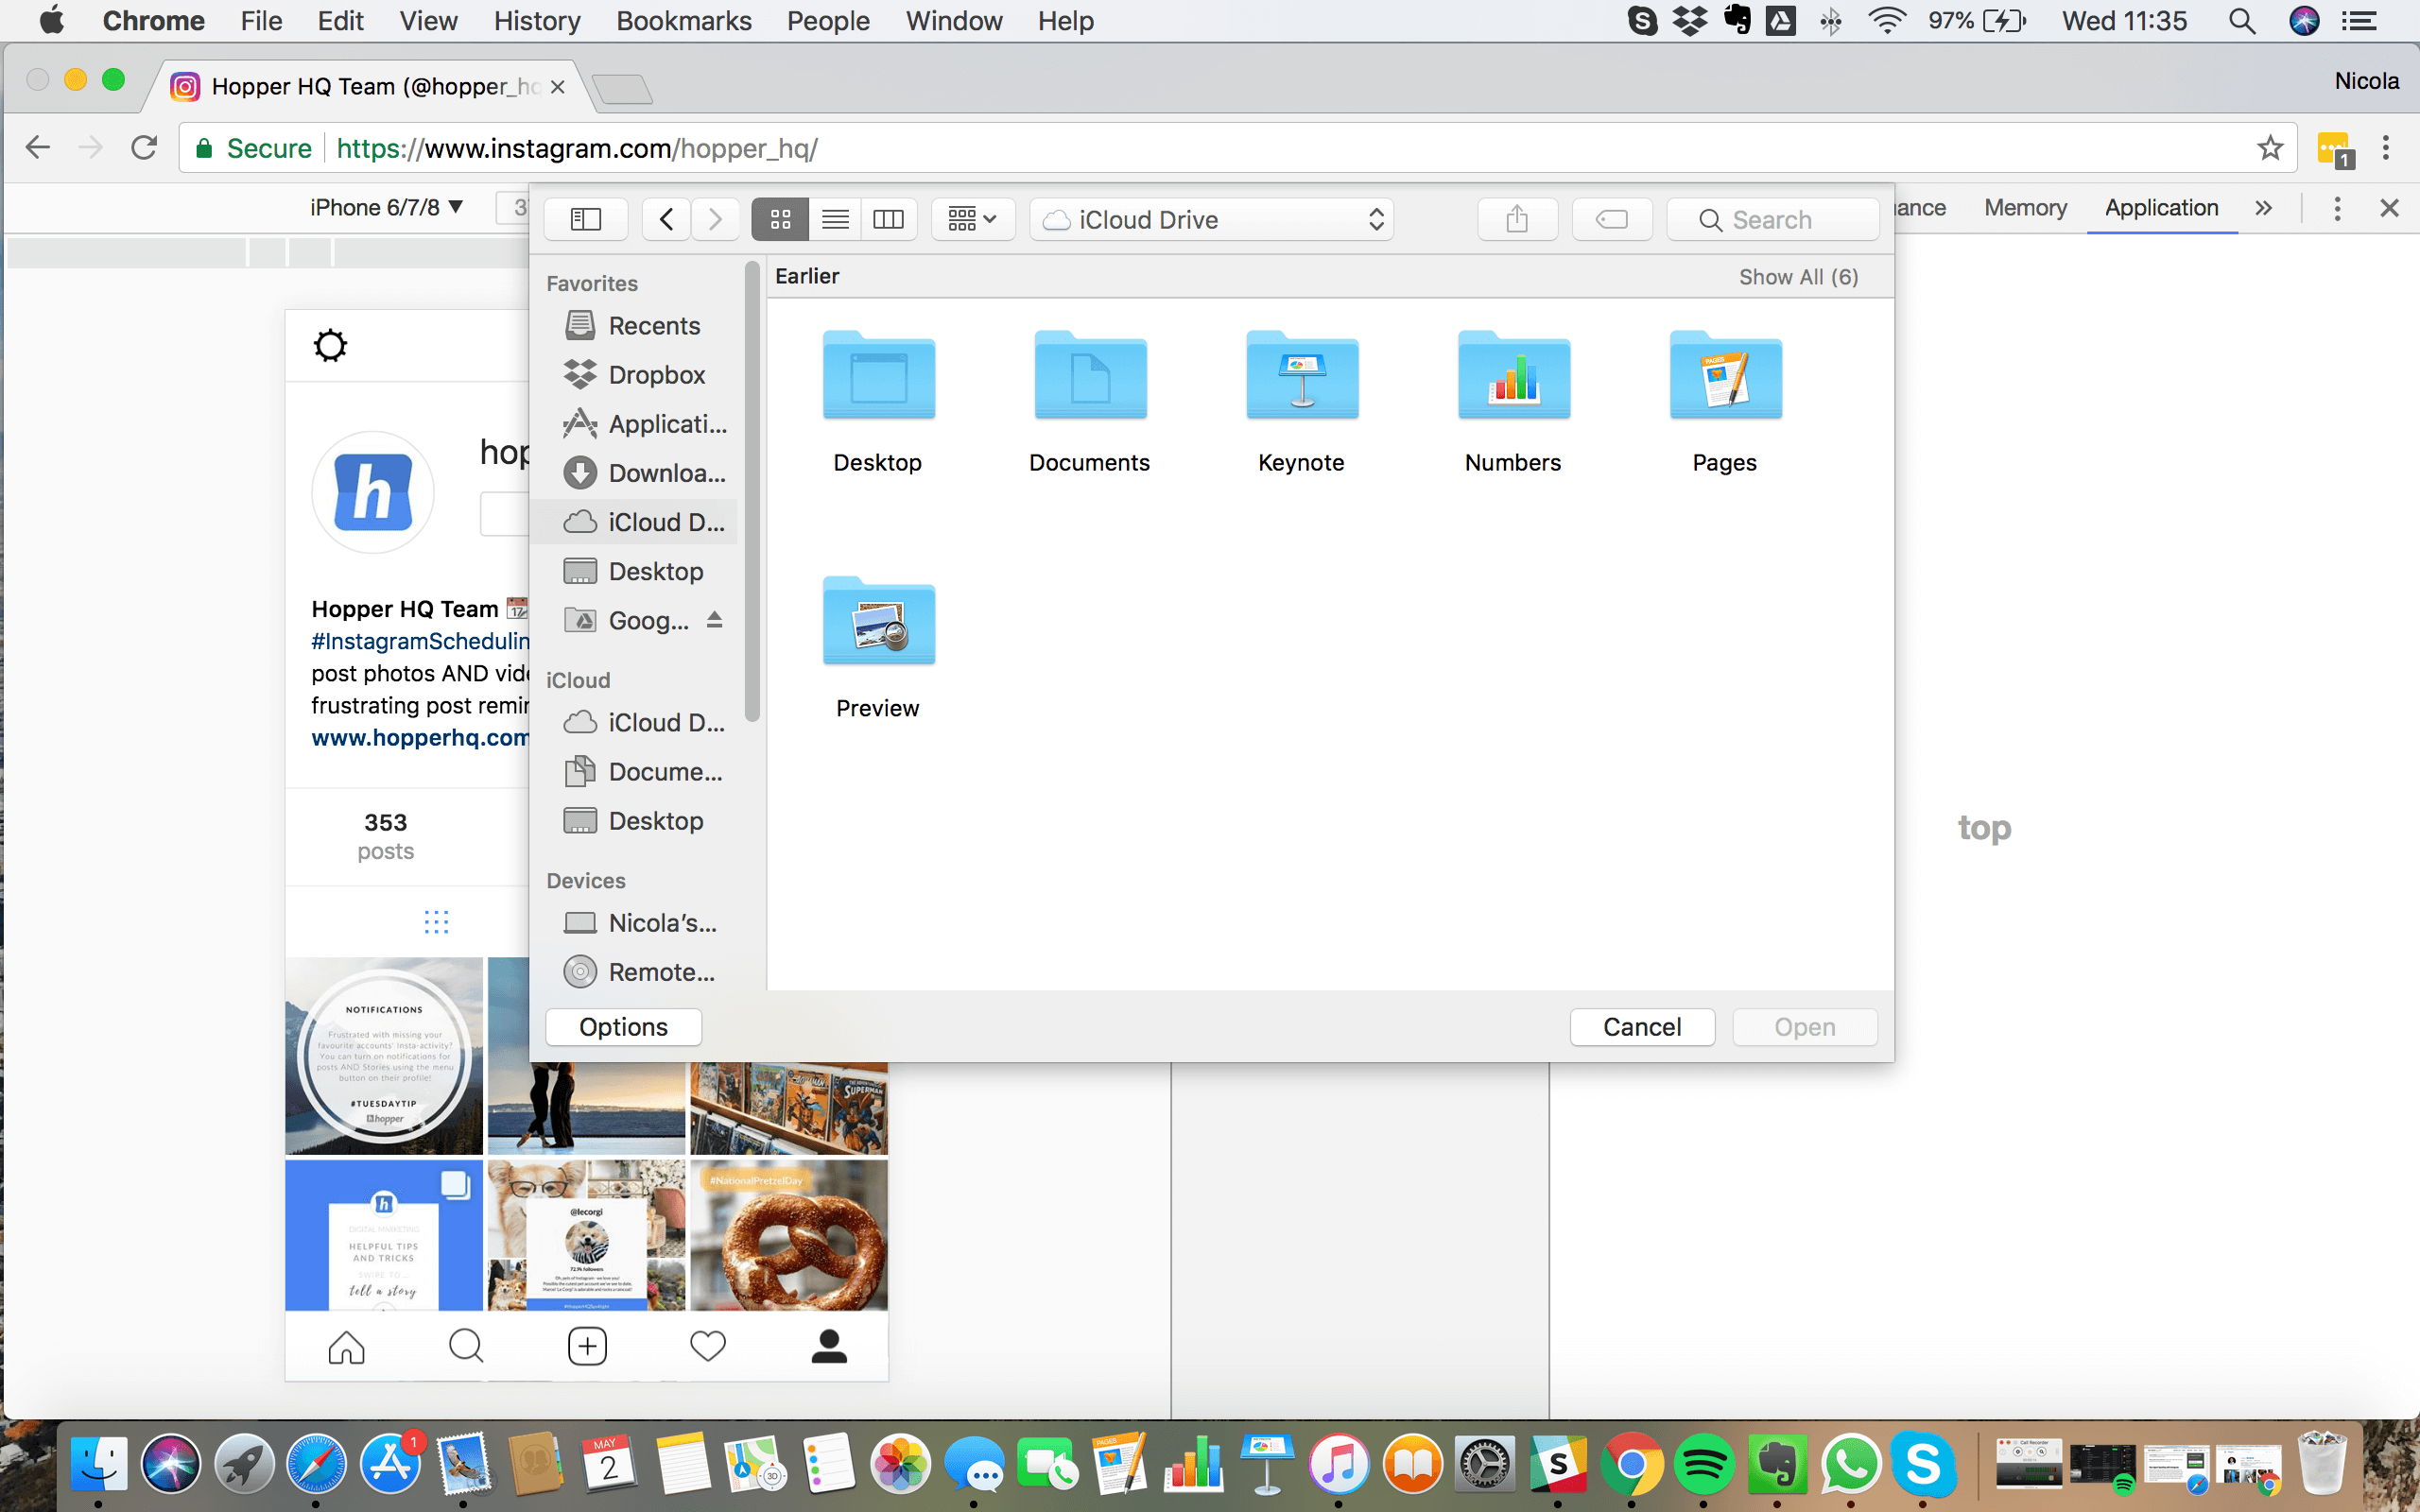
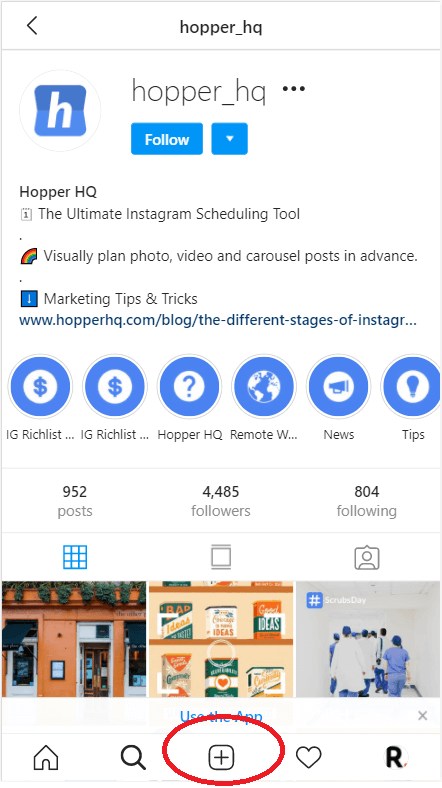
Once you have set the user-agent to a mobile device, launch Instagram on the browser. You should be able to see the Post button. Click this button to start posting photos or videos on Instagram from your desktop or laptop computer.
Summary:
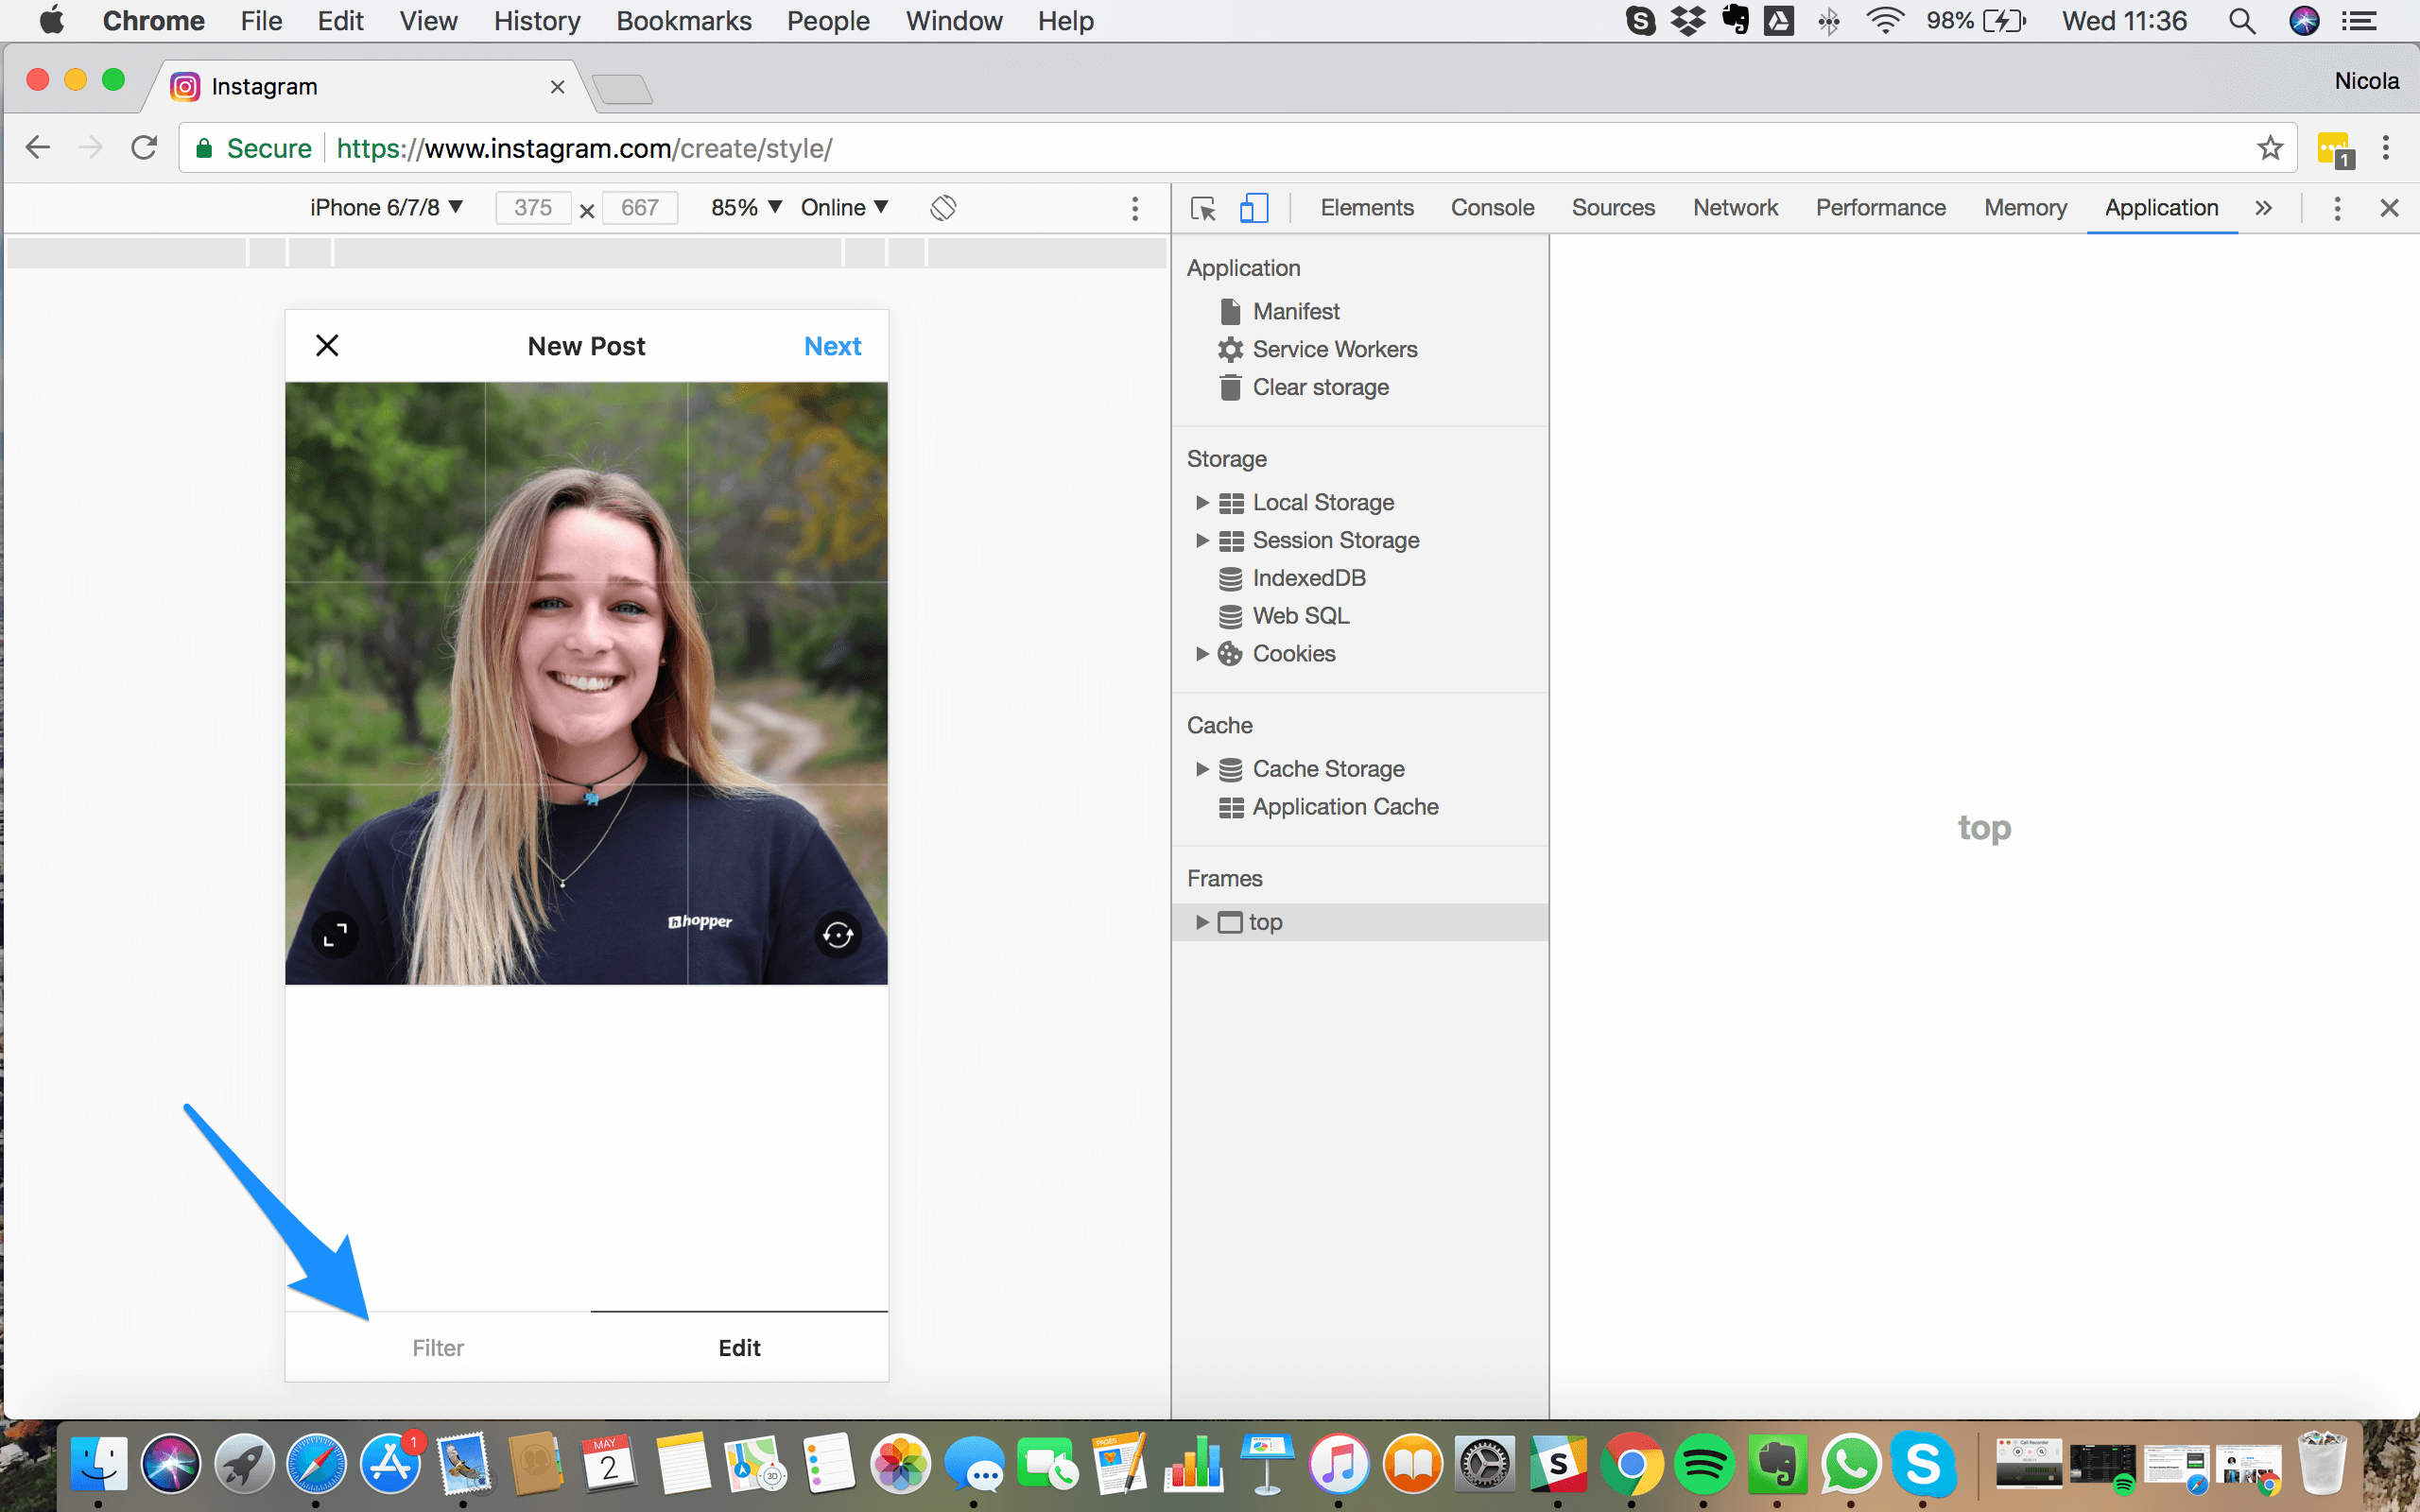
Whilst this is a simple and free solution to upload to Instagram from PC or Mac, there are many limitations. Despite the interface being almost identical to Instagram on mobile, it is missing all its editing tools and the ability to post multiple photos and videos. This is a handy quick fix if your photos are ready to go on your desktop or USB and you don’t have time to transfer them over to your phone!
Plan & schedule social media ahead of time.
Video, gallery & image posts
Calendar, feed & grid preview
Instagram, Facebook & Twitter
START PLANNING YOUR POSTS NOW
Use Third-Party Tools To Post On Instagram From Any Computer
The other way to post to Instagram from your PC or Mac is to use a third-party tool. These are programs you can download to your desktop or use online which post to your account for you. We took a look at the ones available online and have summarised them below:
Bluestacks
Bluestacks is an Android emulator for your Mac or PC and offers a scaled-back version of the Instagram Android app, all you need is a Google account. This is the most similar method to the ones listed above, as it simply allows you to use the mobile app on the desktop without any additional features such as bulk upload or multiple account management. Here’s how it works:
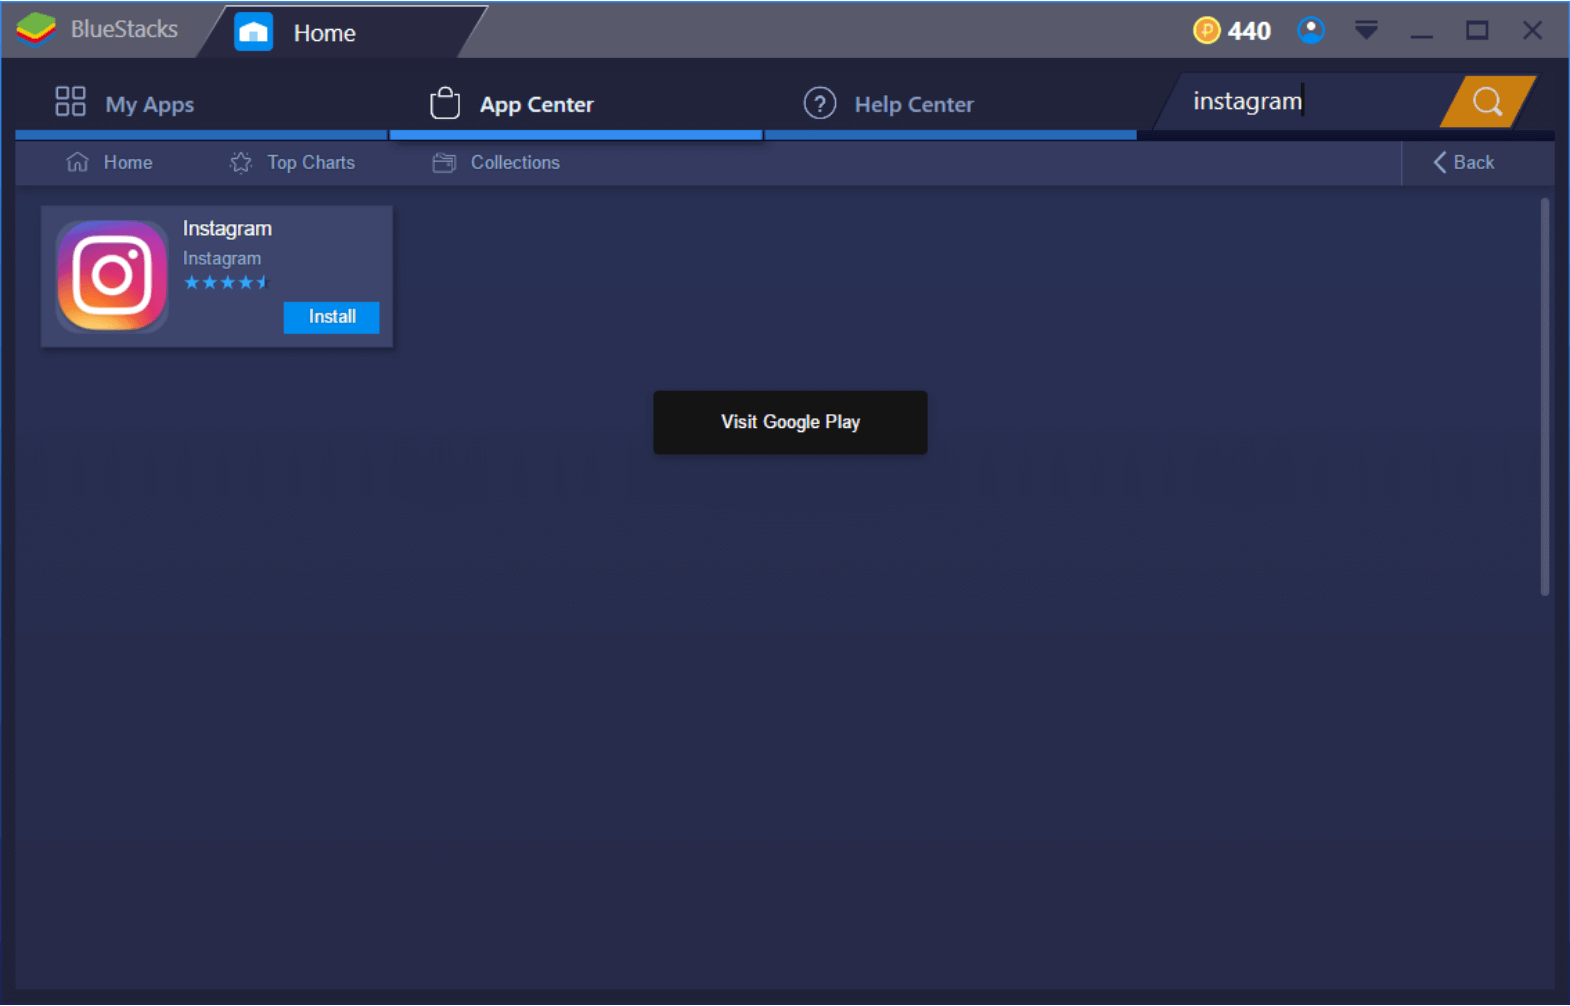
Once you download Bluestacks on to your computer, you will need to upload your content into the Media Manager on the platform. Then simply search for Instagram using the search bar in the top right-hand corner of the App Center, and click Install.
2. Once you open Instagram, the platform interface will change to the dimensions and view of the android app, similar to changing the user agent on Chrome.
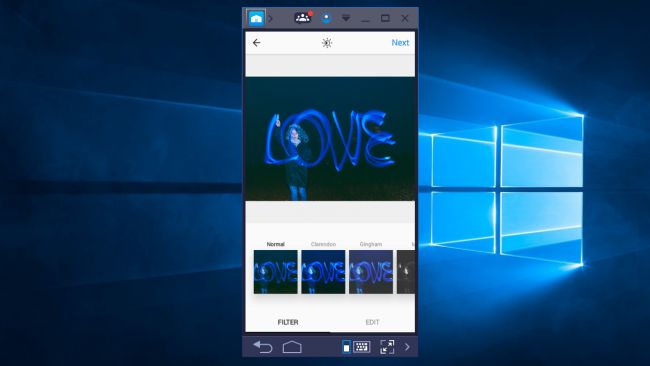
This is a good and simple way to post to Instagram from a PC or Mac. Instagram on Bluestacks works exactly the same way as it does on mobile (UPDATE: As of Sept 2018 Bluestacks no longer supports video). It is therefore a better alternative to changing the user agent on your browser, as you can edit posts, and share with other social networks. The downside to Bluestacks comes if you want to upload in bulk, share your posts to multiple accounts, or schedule in advance.
For an in-depth tutorial of how to post to Instagram from PC or Mac with Bluestacks, watch ZR3D’s Youtube guide from earlier this year.
Deskgram
Deskgram is a desktop app that lets you post to Instagram from PC or Mac, as well as browsing, commenting, and liking posts as you would on the mobile app.
You can upload photos and videos – although the video is not currently supported on Windows – use filters, trim video, tag other accounts in posts, and hashtag search.
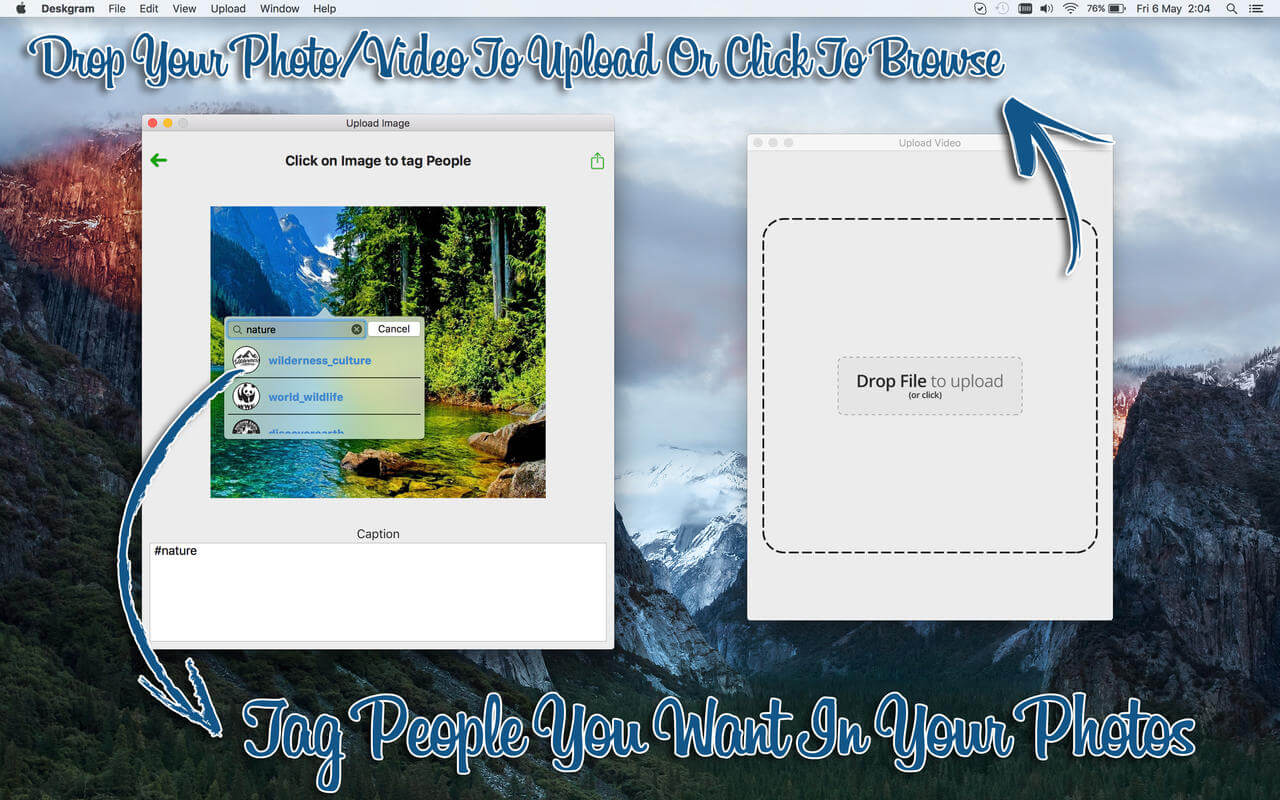
Summary:
A useful but slightly basic tool to post to Instagram from PC or Mac. The lack of video upload for Windows is a downside, and as you can’t upload in bulk it does not offer anything additional from Bluestacks, which is a free service.
Uplet is a downloadable Instagram uploader exclusively for Mac. You can bulk upload photos and videos from your computer and send them straight to your Instagram profile with a caption, all you need to do is download it and log in with your Instagram details. A recent update now also allows you to send posts to multiple Instagram accounts that you manage.
The program has a very simple interface as you can see from the screenshots below:
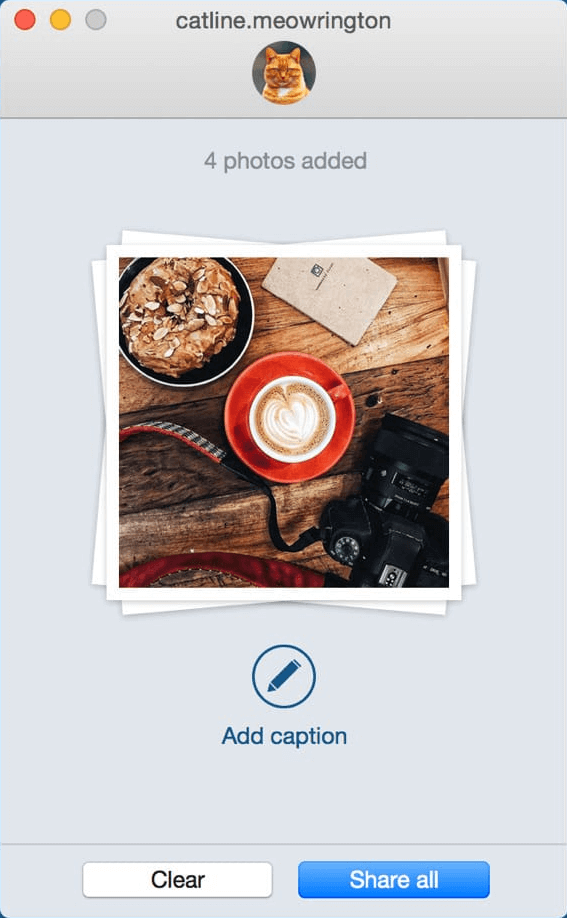
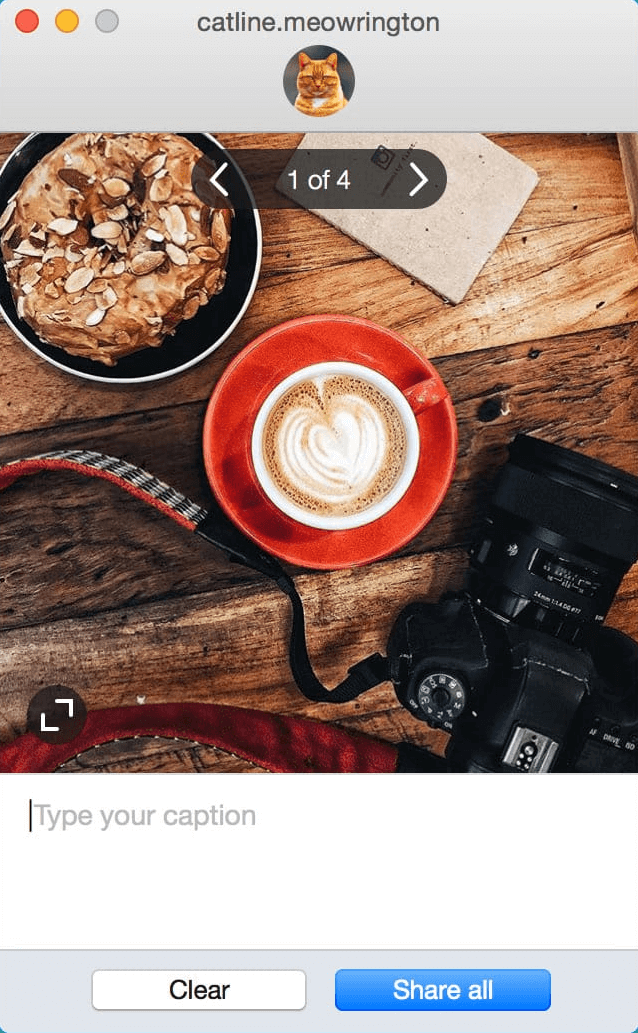
Photo source: https://getuplet.com/
Uplet lacks any filters or editing features, although you are able to shrink your posts to make them portrait or landscape. If uploading a video to the program, ensure it is ready to go with Instagram’s 60-second limit, as Uplet does not have in-app trimming features.
[“source=hopperhq”]