How to use Gmail’s Google Tasks as your daily to-do list
![]()
Dedicated to-do apps abound, but one of the best may be right in your inbox. Google Tasks, integrated into Gmail, provides a simple way to create ordered task lists, complete with due dates, and even turn emails into action items. Here’s how to get started.
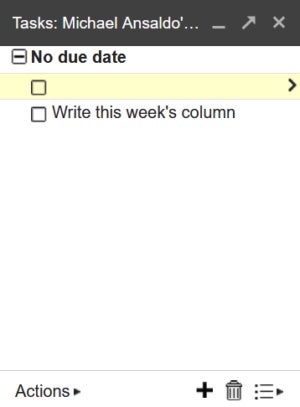
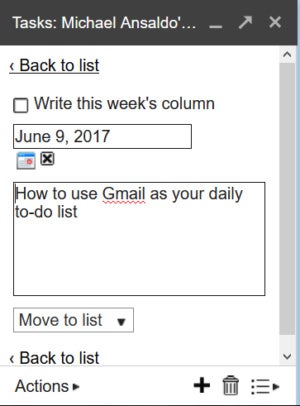
Create a task
PCWorld
To start building a to-do list, click the down arrow next to “Gmail” in the upper left corner of your inbox. The Tasks window will open in the lower-right corner. To add a task, click the plus icon at the bottom of the window. A blank field will open with a checkbox and a blinking cursor. Type in your action item.
If you want to add a due date or notes, click the arrow to the right of the task and enter the details in the appropriate fields.
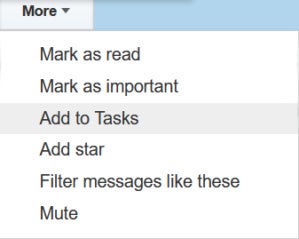
Turn an email message into a task
PCWorld
You probably find that a good chunk of the emails you receive require some action from you. Google Tasks allows you to quickly turn these messages into to-do items without leaving your inbox.
To turn an email into a task, select the message either by selecting the checkbox next to it or opening it. Next, click the More button above your inbox and select Add to Tasks from the drop-down menu. The message is added to your to-do list using the subject line as the item name. A link to the original message is also included. As when you create a task, you can add a due date and other details by clicking the arrow next to the task.
Add sub-tasks
For more complex to-dos, you’ll want to break the main task into several sub-tasks. To do this, create each sub-task under the main task and hit the Tab button to indent each one.
Make multiple task lists
PCWorld
In addition to your daily task list, you may want to create separate lists dedicated to specific projects. To do this, click the Switch List icon (it looks like three bullets, each followed by a line) at the bottom of your main task list and select New list from the pop-up menu. Enter the name of your new list, then click OK and add your tasks. When you want to switch between lists, just click the Switch List icon and choose the one you want.
Print or email lists and other actions
To print or email a task list click the Actions button and select the appropriate option. From here you can also rearrange your tasks either by sorting them by due date or manually moving them up and down using the displayed key combos.